Alas I wasn't one of the lucky winner's in this competition but then given it was my first EVER Manufacturer's Design Team Application, so I'm not too distraught. I've chalked it up as learning experience and confidence booster and proof to myself that I can do it. No more putting off opportunities... now is the time to just go for it.
I'm sure the successful members of the Simple Stories will be absolutely amazing and I for one look forward to seeing what they come up with for this amazing range of products.
So here are the two projects that I created using the Simple Stories products specifically for my application.
LAYOUT - "Poppa and Me"
This is a picture of my darling Hubbie and my equally darling Granddaughter. It was taken the day of the funeral of my step children's late maternal Grandfather. This was also the day of the devastating earthquake down in Christchurch that killed so many people and destroyed so many lives.
Before the funeral we went and placed flowers on their Mother's and Great Grandmother's graves as well, to let them know we were thinking of them. Hubbie took GD for a walk (in reality he went chasing after her when she ran off). She walked down to a rubbish bin, took off one shoe, then he finally convinced her to walk back, albeit one shoe on, one shoe off.
I remember thinking how absolutely adorable they looked together.
The background is red cardstock (brand unknown), layered on are two papers from the Simple Stories "Year-ography" range. The White with words is "Blue/Newsprint" while the red is the "Red/Mini Calendar". I shaped them using two of my trusty self-cut templates then distressed inked the edges using Tim Holtz Distress Ink "Vintage Photo". I then splashed and dripped watered down gold acrylic paint to add to the shimmer on the page.
I simply embellished the page using some Rosies Paper Lace in cream which I lightly distressed with the left over gold paint and one of the 4" x 6" Sentiment blocks from the "Vertical Journaling Card Elements" patterned paper. I distressed the edges lightly with a little more gold paint to tie it with the rest of the background.
The photo I aged digitally using one of the vignette's from Photoscape.
MINI ALBUM - "Destination - Earthquake Central"
At the end of March I am heading down to my home town of Christchurch. This will be the first time I have been there since all the earthquakes started in September 2010. I wanted to create a mini album to record my first visit and the changes that I recognise from when I used to live down there.
The mini album is held together with three ring binders, so I can easily add additional pages on the go while I am down in Christchurch or after I get back to Auckland.
I used patterned pages from Simple Stories "Destinations" collection. The front and back covers are covered in Destinations - Journey patterned paper. The insert is the reverse of the burgundy. I distressed the hounds tooth pattern with Tim Holtz Distress Inks in Mustard Seed, Vintage Photo, Fired Brick and Crushed Olive. I wrapped the patterned paper around from the inside of the cover and distressed the edges. For more on this technique see here. The letters on the front are also part of the Destinations collection.
The pages are all created using various pages from the Destinations collection. Some are full size (5 1/2" x 8") while others are smaller. I also have three pages that are made from paper bags in various sizes. These all form pockets that I can put memorabilia in, journaling cards or additional pictures.
Hopefully you can see these and the fold out pages as well in some of the pictures of the album below.
Once I return from Christchurch and have added some journaling, pictures and memorabilia I will share the finished Mini to show all the pages and tags and bits and pieces.
Showing posts with label Manufacturers. Show all posts
Monday, March 5, 2012
Wednesday, February 29, 2012
Valentine's Tags
Okay the last Valentine's creation this year I promise.
But first... a huge big HAPPY BIRTHDAY to my nephew Dallas who turns four today. Being a leap year baby this is technically his first birthday on his actual birthday. Love you Dallas xxx
Tags...
Some people love them...
Some people hate them...
Tim Holtz is the king of making them...
Me... I'm a fence sitter on this one.
I love tags to look at. I even quite enjoy making them, but (and you could sense it was there waiting)... I'm not sure I see the point in them on their own. What am I supposed to do with them?
ATC's (Artist Trading Cards for the uninitiated) I get. These are like a cross between a Sports Trading Cards and an individually personalised business card for a really amazing and incredibly talented artistic type person.
If done properly (so to speak) they will easily fit inside the same plastic pocket refills that Sports trading cards fit into but tags... not a chance in this lifetime.
Tags for some reason only to the artist who made them, also tend to have a lot more 3D embellishments, so even if you did find the perfectly divided pocket protector, they still wouldn't fit. And I have to wonder, for the same reason, whether or not you would use them on a layout, for a similar reason... would it be to bulky for inside the page protector?
Anyway... I still love them, now I just need to decide what to do with them.
Here is this year's Valentine's Tags.
Candy Pink cardstock base with the edges distressed using Tim Holtz Walnut Ink Distress Ink. Patterned paper from Teresa Collins Posh Range also inked with same distress ink. Keys are from The Dusty Attic. I painted these in silver acrylic paint which I had mixed with some Reeves Iridescent Medium. Once dried I sand the edges a little for a distressed look then ink the keys with Tim Holtz Walnut Distress Ink, wiping the excess off with a tissue. I stamped the saying, numbers and then finally the sentiment using Tsukineko Brilliance Ink - Coffee Bean. Final step was to add the flowers to the bottom left hand corner.
After taking the pictures I remembered I needed to add a hole and some ribbon to make it look more like a tag... but I forgot to take a picture.
Ooops sorry!
If anyone is interested I can post a step by step tutorial on this tag as well.
Maybe I should stop asking and just do it...?
But first... a huge big HAPPY BIRTHDAY to my nephew Dallas who turns four today. Being a leap year baby this is technically his first birthday on his actual birthday. Love you Dallas xxx
Tags...
Some people love them...
Some people hate them...
Tim Holtz is the king of making them...
Me... I'm a fence sitter on this one.
I love tags to look at. I even quite enjoy making them, but (and you could sense it was there waiting)... I'm not sure I see the point in them on their own. What am I supposed to do with them?
ATC's (Artist Trading Cards for the uninitiated) I get. These are like a cross between a Sports Trading Cards and an individually personalised business card for a really amazing and incredibly talented artistic type person.
If done properly (so to speak) they will easily fit inside the same plastic pocket refills that Sports trading cards fit into but tags... not a chance in this lifetime.
Tags for some reason only to the artist who made them, also tend to have a lot more 3D embellishments, so even if you did find the perfectly divided pocket protector, they still wouldn't fit. And I have to wonder, for the same reason, whether or not you would use them on a layout, for a similar reason... would it be to bulky for inside the page protector?
Anyway... I still love them, now I just need to decide what to do with them.
Here is this year's Valentine's Tags.
Candy Pink cardstock base with the edges distressed using Tim Holtz Walnut Ink Distress Ink. Patterned paper from Teresa Collins Posh Range also inked with same distress ink. Keys are from The Dusty Attic. I painted these in silver acrylic paint which I had mixed with some Reeves Iridescent Medium. Once dried I sand the edges a little for a distressed look then ink the keys with Tim Holtz Walnut Distress Ink, wiping the excess off with a tissue. I stamped the saying, numbers and then finally the sentiment using Tsukineko Brilliance Ink - Coffee Bean. Final step was to add the flowers to the bottom left hand corner.
After taking the pictures I remembered I needed to add a hole and some ribbon to make it look more like a tag... but I forgot to take a picture.
Ooops sorry!
If anyone is interested I can post a step by step tutorial on this tag as well.
Maybe I should stop asking and just do it...?
Saturday, December 3, 2011
Christmas Craft Challenge 2011 - Day 3
As if I wasn't already busy enough, I once again joined in some swaps through Crafting Passionz a networking group for New Zealand & Australian scrapbookers & crafters. Not one, but three swaps. So here is the first of these.
Crafting Passionz Swap - Christmas Cards
We each had to create two Christmas Cards to swap with the other participants.
I wrapped some cardstock in tinfoil then embossed it using my Cuttlebug machine and a Christmas Subway themed die. I then dabbed Adirondack Alcohol Inks over the embossing to add some colour. I mounted this on a coordinating cardstock and then directly onto the card itself.
I love the second set of cards for a number of reasons. The colour most definitely - I am a bright, clear colour kind of gal rather than a muted, pastel type of person. I love the Christmas Bauble on the front - they turned out better than I hoped for and more importantly... I love that it can be removed from the card and the ornament used each year as a Christmas decoration either on your tree or hung in the window to catch the light.
Crafting Passionz Swap - Christmas Cards
We each had to create two Christmas Cards to swap with the other participants.
I wrapped some cardstock in tinfoil then embossed it using my Cuttlebug machine and a Christmas Subway themed die. I then dabbed Adirondack Alcohol Inks over the embossing to add some colour. I mounted this on a coordinating cardstock and then directly onto the card itself.
I love the second set of cards for a number of reasons. The colour most definitely - I am a bright, clear colour kind of gal rather than a muted, pastel type of person. I love the Christmas Bauble on the front - they turned out better than I hoped for and more importantly... I love that it can be removed from the card and the ornament used each year as a Christmas decoration either on your tree or hung in the window to catch the light.
- I used these Christmas Bauble die-cuts from Dusty Attic which you can get from my Scrap FX online shop.
- I painted them with the Creative Imaginations Radiant Rain Paint Dauber in Gold and then Red
- Then some heavy spritzing with Tattered Angels Glimmer Mist in Gold.
- After waiting for the paint to dry... OK I used my heat gun to speed up the process...
- I then affixed behind each bauble a small sheet of Angelina Heat Bondable Film using Helmar Tiger Grip Glue.I let this dry at least 30 minutes before trimming around the bauble as close as possible (about 1-2mm edge). Note - I used four different colours, one behind each bauble so they are unique.
- I then used my trusty heat gun again to shrink the Angelina Film. It shrinks as it is heated which in turn creates a myriad of amazing colours and colour swirls somewhat akin to the Aurora Borealis lights.
- I mounted some patterned & glittered paper onto some cardstock and then the card base.
- Punch holes in the top of the card using my Crop-O-Dile to feed the ribbon through.
- Finally attached the bauble using a bow (so it can easily be removed)
Here is a close up of each bauble before it was attached to the card.
Watch this space for another Christmas Craft project using the Angelina Film.
I will be running some classes in the new year on using the Angelina Film with some really cute Dusty Attic chipboard die-cuts, so if you are keen to find out more, please let me know and I can send you some details about the classes.
Labels:
Cards,
Christmas Craft Challenge,
Manufacturers,
Products,
Techniques
Saturday, July 30, 2011
New Products - Die Cuts from The Dusty Attic
Not long before SENZ, I signed with a new supplier who design and create a range of absolutely amazing laser die-cut chipboard embellishments and projects. I ordered some stock and it arrived the day before I was due to set up everything at SENZ so I didn't get a chance to have a play and experiment with the new products. I didn't even get a chance to take photos as it was straight out of the courier box onto the display wall with barely a moment to spare.
I think these products are pretty amazing and so do a lot of other people around the world - you just need to read some of the rave reviews and look at some of the amazing creations using these products. So it wasn't really a surprise when I sold out of quite a few products over the weekend of SENZ. I just didn't expect them to go SO FAST - some items sold out the FIRST DAY!
After recovering and finally unpacking (interrupted by a family funeral and the flu), I placed another order to restock as well as get some new products which took my fancy and these all arrived this week. This time I have taken photos (so I can add the new products to the website) but I'm going to share them with you here first.
I've grouped them together, just to make it a little easier, but please bear in mind that the sizing in these photos is in reality very different. I've fitted the photos into a block and re-sized them all to fit inside these blocks, so you will need to check out the website for actual dimensions.
I think these products are pretty amazing and so do a lot of other people around the world - you just need to read some of the rave reviews and look at some of the amazing creations using these products. So it wasn't really a surprise when I sold out of quite a few products over the weekend of SENZ. I just didn't expect them to go SO FAST - some items sold out the FIRST DAY!
After recovering and finally unpacking (interrupted by a family funeral and the flu), I placed another order to restock as well as get some new products which took my fancy and these all arrived this week. This time I have taken photos (so I can add the new products to the website) but I'm going to share them with you here first.
I've grouped them together, just to make it a little easier, but please bear in mind that the sizing in these photos is in reality very different. I've fitted the photos into a block and re-sized them all to fit inside these blocks, so you will need to check out the website for actual dimensions.
Skeleton Clock Face & Hinges
Cogs Frames Set; Jumbo Cogs 10pk; Cogs 1 & Cogs 2
Dress Forms & Wire Dress Forms
Mini Sparrows; Flutterbies; Birds on a Branch
Botanic Accents; Foliage; Leafy Stems
Flower Layers 1,2 & 3
Mini Vine, Branches and Dress Forms
Scroll Borders
Scrolls
Vine Flourish; Fancy Labels, Christmas Baubles and Holly Flourish
Chandelier Small; Vintage Clock; Vintage Chandelier; Vintage Hat Stand; Vintage Keys
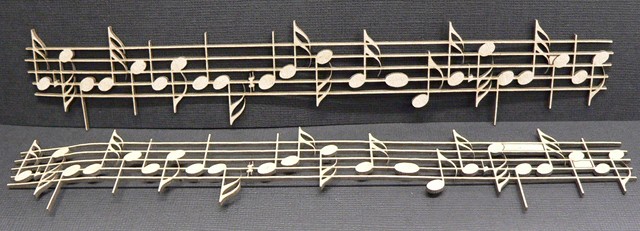
Music Border (2 pk)
Bird House Project - comes as a flat pack of die cut pieces.
This is only a mere hint of the range that is available at The Dusty Attic. I will be placing regular orders with them, so if you spot something on their website that takes your fancy, let me know and I can order it. Remember our policy all pre-paid orders receive a discount off the listed website price.
I will come back and edit this post with links to all the products in my online shop but I couldn't wait I just had to share these with all my scrapping friends and family.
Fingers and toes crossed that I get a chance to experiment over the weekend, so I can post what the finished product looks like... watch this space!
Subscribe to:
Posts (Atom)