Showing posts with label Cards. Show all posts

Wednesday, January 15, 2014

Christmas Craft Challenge 2 of ?

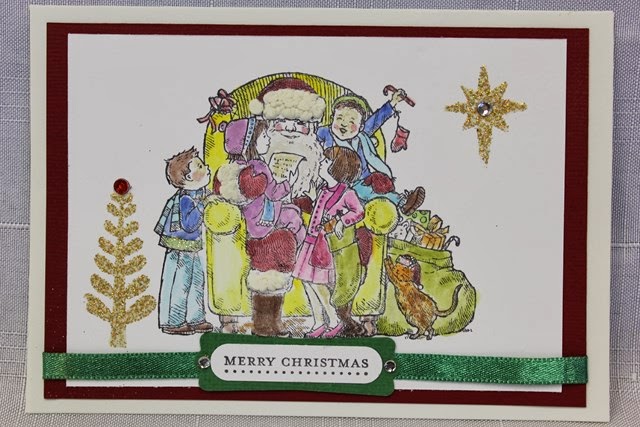
I received this first card from my friend Brenda to say Hello, Merry Christmas and thank you for hosting some of the swaps on Artistic Creationz this year. It was a lovely surprise and I really love the rosette flower she made for the front.
These other cards are from the lovely ladies at Artistic Creationz who joined in the Christmas Card swap.
 Very cute card... hedgehog is made using FlowerSoft (I think that's what it's called).
 Cute little wee card with tag.


 Hand painted card. Love the postal stamp on the envelope, so had to include that as well.

 Easel card with a difference. Love the difference!
 The lilac is a beautiful metallic look paper that this picture just does not show how lovely it is.

Wednesday, July 17, 2013

In my spare time I made 30 coffins...

Well technically they were coffin cards... but that wouldn't have raised as many eye brows.
This month my step daughter Alysha turns 21. She decided very early on that she wanted a party and the theme of the party would be Zombies.
The invitations therefore needed to be appropriate to the theme, so after some googling for Halloween ideas, coffins were the stand out idea to try. As some invitations had to be posted out around the country, I wanted a flat coffin design rather than making three dimensional boxes which would probably be squished along the way through the postal service.
I found a pattern for a bi-fold card in a coffin shape. I wanted a little bit more design than this, so I adapted the pattern to a tri-fold card still in the same coffin shape. The folds are all on the long side of the coffin. As I had to make 30 invitations, I cut a template for the card from plastic so that all invitations would end up the same size and shape.
This is the card as it looked when taken out of the envelope. Each card was cut by hand from white cardstock. The outside of the card was given a wood grain effect using acrylic paint and Tim Holtz Distress Stains.
I cut small rectangles of recycled cardboard to size then covered them with metallic silver duct tape. I then ran these through my Cuttlebug using the Cuttlebug RIP Tombstone Embossing Folder from the combo set of the same name. I had to be very careful with the placement to ensure only the "RIP" was embossed in each instance. Each embossed plate was then run through my Xyron 150 before being adhered in place on the front of each card.
The left side of the card was opened and the right side then showed scratch marks to show the Zombie trying to escape from their coffin... cool touch I know. The scratches were made using my Tonic Studios Tim Holtz Retractable Craft Scratcher Tool.
Inside the right side of the card I adhered a small rectangle with contact phone numbers for the RSVP. Inside the card was a separate coffin shaped piece of kraft cardstock which had all the important details printed on. I utilised the SF Gushing Meadows Font to highlight the theme in a couple of places on the invite... doesn't it just look like dripping blood!! Both the insert and the RSVP slip were also edged in Walnut Stain Distress Ink.
The card opened out to show the outside and the wood grain effect. The wood graining was intentionally done to follow the line of each section of the card.
The inside of the card was vintaged using liquid Walnut Inks in Walnut and Terracotta which I watered down further to give an aged look. Close up the effect is that of white fabric which has become stained and aged through time.
I really love the finished look of these invites and both aging techniques as well. I will definitely be using these techniques again in other projects!

Wednesday, March 27, 2013

True Blood... well Fake Blood really

I wanted to do a little something for a friend of mine, Chelle, over in Australia. We've not known each other that long but just clicked the moment we met and have just kind of adopted each other as sisters ever since.
We have the same taste in music, television, movies and our senses of humour are the same, warped and wicked and dry and sarcastic and not everyone gets it... but I digress...
We are both AVID True Blood fans so it seemed natural that what I sent her should be something along those lines.
I really love the way this turned out... not quite how I planned it... had a bit of a oppsy... but I managed to cover it up and I think it works.
The cover opened up to see the front and the back. 
I used Bazzill White cardstock and left it completely plain. I measured the size I wanted, scored a 1/4 inch spine and folded it to form a mini folder. 
I then mixed equal parts of Semco Acrylic "Classic Red" and Pebbles Inc "Red" to get the shade of red that I wanted for my blood, then thinned the mixture out with water to get the consistency I wanted in order to get the drips. 
Front cover... complete with mistake and cover up.
In order to create the drips, I loaded a reasonably fine paint brush with some of my liquid blood then scraped the bristles along the top of the cardstock effectively wiping the paint off the bristles, all while I held the cardstock upright to encourage gravity to do its job. 
This was somewhat of an exercise in patience. I made sure I didn't overload the brush each time as I didn't want all the drips to flow down to the bottom. For the shortest drips, I used one or two "scraping" of liquid blood. For the medium drips was three or four "scrapings" and the longest drips were five or six "scrapings" of blood.
Close-up of my "finger prints". 
I don't think I will ever make it on the police force. I struggled to get clear finger prints... even after a few trials on scrap paper LOL - but then as we all know I am a self-confessed perfectionist and I usually think I can do things better!!

Thursday, February 28, 2013

Birthday Cards

I guess I should show that I have actually been doing some crafty type things and not just waltzing around only taking pictures here and there.

My three adorable nephews, Jordan, Dallas and Troy live in Nelson in the South Island and I live in Auckland in the North Island of New Zealand. That's quite some travelling distance for here, given that New Zealand is really not that big... I means let's be honest... you can travel from one end to the other in a day, including the three hour ferry ride between islands, if you pushed it and didn't travel with screaming or bored kids!!! I'm not even going to compare travelling distances across the US or through Europe, so I'm not complaining; I'm just saying, it's not like we see each other every other day or week or even month.

So when it comes to Christmas and Birthday presents I try to get a little organised as all three birthday's are in the first half of the year, and if I am organised then I can send their birthday presents when I send their Christmas presents. They are also usually the only ones that get hand made birthday cards because I am organised enough to think ahead. Alas I'm not usually organised enough to think ahead and do the same with everyone else I give cards to. I know... I'm slack. I'm a procrastinator from way back... and that seems to beat being a crafter 9 out of 10 times despite the best of intentions and no matter how many New Year's resolutions I make. I'm not the only one... I just don't mind admitting (yet again) I am less than perfect!!!

Anyway... the point of the rambling is that I was organised and I did make their birthday cards again this year.

Jordan was 7 in January... he's getting to be such a big boy now!!! I wanted to give him a big boy's card and encourage him to read (a definite favourite pass-time for me).
I had a "Totally Boy" die cut which I used as the base for a book mark. I've had it forever and never used it so decided it needed to come out of my stash and go to a new home. I double matted it on some metallic looking paper and some yellow cardstock from a 8" x 8" paper stash from way back when. Really love the torn edge on the metallic paper.
 I used some more coordinating paper from the 8"x 8" paper pack and wrapped it around the card then made a strip from the leftovers of the metallic paper. I adhered this strip at either end only so that I could slip the book mark inside it to hold it in place until it was removed to be used. I finished off the card with a bottle cap I've also had forever. I think everything for all three cards was from my stash... I have a big stash!!!
With the bookmark slipped inside the wrap around strip, this is what the finished card looked like.

Dallas is five this year and off to big boy school. His birthday is 29th February so he only has a 'real' birthday every four years so it is always a big deal.

He's into mechanical things so I couldn't resist using up some more of my stash - this time a selection of robot and space themed stickers and more paper from the same 8" x 8" paper pack.
Really loved that there were two colours of the same patterned paper in the pack. (There was also a green but it didn't suit the colour scheme lol). In hindsight... I should probably have placed the patterned papers the other way up, so the blue was the sky... but it still looks cool.
Added a dimensional "D" sticker to finish it off. Quick and easy.

And last but not least Troy will be three in May. I know that is a few months off... but his mummy can store his present just as easily as I can...
I had fun making this card. The patterned paper was from the same 8" x 8" pack (very versatile selection). I know he has a "Cars" themed bedspread and matching decor in his room. I had some leftover "Cars" themed dimensional stickers, complete with googly eyes, so as soon as I saw this paper which kind of looked like asphalt, I knew what I wanted to do.
I cut the paper down to fit onto the card base then sketched the road plan on the reverse of the paper. I then hand cut by eye a pattern to fit both the front and back of the card base but without covering too much of the fold.
I adhered the road in place using my Mega Runner by Teresa Collins and Xyron. It was so easy to follow the road pattern and much quicker than using photo splits all over the place. It also meant I didn't have to wait for the glue to dry, before I drew my road marking by hand. I finished off the card by placing the cars on the road as if they were driving around.

Three very simple cards all using leftover from my stash. Now.... who is next on my birthday list??

Thursday, January 3, 2013

Christmas Craft Challenge - Day 19

Day 19 - Gift Card Wrapping

Every year I give a few gift cards to various family members. My parents usually get one as they live out of town so a gift card is always much safer to post (and usually cheaper as well). As my step kids get older, they have also asked for gift cards as presents so they can buy something they like or they save them up to buy something a little more expensive.
So each year I try to find a new way to wrap them up, rather than just putting them inside a Christmas Card.
2010 - Gift card folder and band with stick pin
2011 - Santa themed gift folder

This year I was a little pressed for time, so I did some googling (as I frequently do) and found a tutorial for an Origami Gift Card Holder... all you need is a piece of paper 9" x 9".
For instructions... please check out this tutorial
This paper was quite heavy, so I found the finished folder separated quite a bit at the top (which I didn't like) so I added a small strip of self-adhesive fabric tape to hold it together. 
 I also then added a folded strip of paper to hold it closed. Just left over paper folded on itself twice (bit like making paper bias binding) then slipped inside the two halves of the folder to hold it closed. This worked like a charm and meant I didn't need to use any adhesive to hold it closed.
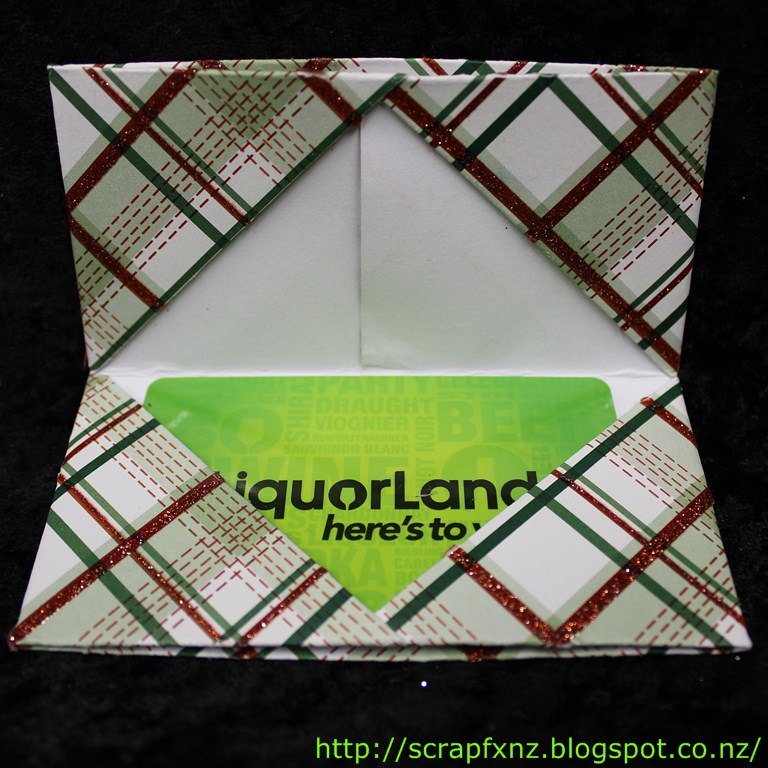
Opened up you can see there is room for two gift cards or one card and a small note.
After making a few of these, I came to the conclusion that a medium weight paper was best for making these. If it is too heavy, the folder doesn't stay closed very well and can be difficult to fold in the first place. If the paper is too light weight/thin, it doesn't feel thick enough to protect the card inside. This paper also was decorated with glitter coated stripes. I found as I folded it, the glitter cracked rather than folded... and being a perfectionist, this annoyed me. Paper choice is important!!!

Christmas Craft Challenge - Day 18

Day 18 - More Christmas Cards

 What can I say... I love this card. Love the colours and all the details. It is also one of those card designs that I have wanted to try since forever... now I have something to follow!!!
From the outside this simply looked like a pretty Christmas card but then when you open it up you are greeted by an amazing 3D Christmas Tree. I was so fascinated I had to take pictures showing the progression of how it folded up...  way cool!!!!


There is simply no denying that I have some incredibly talented crafting friends!!

Christmas Craft Challenge - Day 17

Yes I know these last few Christmas Craft Challenge posts are a little late (yes it's past New Year) and I apologise sincerely for that but the week before Christmas I worked overtime every night as well as doing extra work for another client. Unfortunately something had to go... and it was my blog and Christmas crafting that drew the short straw.

I will finish off these posts so you can see what I should have posted... mainly because much of these creations are from some incredibly talented people that I craft with from around New Zealand and Australia. These are the other side of the swaps that I have already posted... these are pictures of what I received in return. I hope you enjoy!!

Day 17 - Christmas Card Swap - Part 2

I really like this colour scheme... the tan colour looks so sophisticated. 
You can't beat the good old traditional colours for cards either. I love this die cut... may need to look for this for my studio!!
 Another colour scheme that I really like. It's a nice alternative for Christmas and is great if you want something simple and strong. Chocolate brown just seems to go with so many other colours.
Love this picture. I used one similar for my Christmas invites to our family for Christmas lunch at our place. 
Love, love, love this stamp... hint hint Faith!!!!

I should explain that a couple of these were not part of the swap, but actual Christmas cards from my lovely scrapping friends... thank you so much to all my scrapping friends. There are some more still to be posted.

Monday, September 10, 2012

Birthday Card for Dad

I had some left over scraps after I finished making the Wine Journal for my Dad's birthday present. Logic and thrifty scrapping (read cheap skate) led me to using the aforementioned scraps to make a card to match.
And with the present made for him as well. You can see this in more detail here.

Birthday Card - "For You"

Today is my sister's birthday. I've made her a quick card that I have couriered down to her along with my father's birthday card and present. (My parents are spending some time with my sister and her family as it's Dad's 70th birthday this year.)
Here's her card...

I used a technique I played about with some time ago. You can see other samples here and here.
I spritzed over the dried acrylic paint smears with Glimmer Mist before attached some layered flowers. (I misted a white flowers with the same Glimmer Mist I used earlier so they coordinated.)
Finally I finished the card with a quick sentiment in glitter letters.

Sunday, June 17, 2012

Purple "For You" Card

Another quick card that I made to go with a parcel to a scrapping friend in Aussie.
White cardstock base (scrap cardstock), purple patterned paper (from scrap pile), white ribbon tied in bow, white flowers all from KaiserCraft, all in Coconut colour, 4 mini and 1 medium. Stamped images using Stazon Royal Purple.

Saturday, June 16, 2012

Pink Card

My apologies for no blogs for a few days but I've been sick. Just a head cold, but it still takes it out of you and leaves you lethargic and unenthusiastic. None the less, I have managed to complete a few small projects which I would like to share with you.

The first is a card I included in a parcel of goodies I sent to an internet friend who lives in the States.
Simple white cardstock base (scrap cardstock), pink patterned paper (from scrap pile), white ribbon tied in a bow, white cardstock covered with black and white tissue (scrap left from an earlier blog) and three small rhinestones.

Monday, March 19, 2012

Birthday Card

It was my granddaughter's third birthday last Friday though we had her party on Saturday. I made her a very simple card using one of my colour warm up creations from yesterday's post.
I cut out the number 3 from the painted tag. Attached it with foam squares then went around the edge of the number using Kindy Glitz so it would stand out from the background paper.
I wrapped all her presents in brown paper (I love using it as it is so versatile). On one of the larger flat presents I added a very quick Princess collage using some foam stamps and paint.
Given the paper was going to get ripped off in a fairly short time frame I just did something really simple (but cute lol).

Wednesday, February 22, 2012

Valentine's Card

I know Valentine's Day was a week or so ago so maybe I'm a little late... I think we are all used to that with me. I'm a procrastinator and a perfectionist, so it's a wonder I can get ANYTHING done at all.


This card was really simple to make but I think looks so effective.
It's a tri-fold card that was pre-die cut with the heart (The outer heart). I sketched a cutting line inside the die-cut heart then cut the strip off to give me a smaller heart. I added a zebra stripe insert which I sealed inside the card, folding the front flap over so no one could see my handy work. I then adhered the shrunk heart into to centred of the die cut hole.
For anyone who is not a card-maker or scrapper, this just shows you that you can make something that is handmade that looks great without having much more than a pair of scissors.
This is tent-fold card (folded on the top instead of the side). On top of the card base I have layered a piece of white cardstock which I distressed the outer edge with Brilliance Ink - Red Rocket (a favourite of mine). It doesn't show that clearly, but the distressing reaches in 1/2" - 1".
In the bottom left corner I also stamped a flower stem in a dark forest green ink.
I then layered a thick white vellum which I had run though my Cuttlebug machine to dry emboss.
I finished the front of the card with a simple white paper flower and bling flower.
Inside the card I adhered an insert of white cardstock onto which I hand wrote the sentiment "You set my heart all a flutter!"

Wednesday, December 21, 2011

Christmas Craft Challenge 2011 - Day 21

Warning - Today's Blog comes with a warning. Anyone with a delicate disposition should not proceed any further. Do not read this blog in front of children or anyone with a faint heart. 


It contains not only stripping but partial nudity (of a sorts). 


Turn around...


Go back now...


OK, don't say you weren't warned!!


Here it is at last... my 2011 handmade Christmas Card.


Final chance to turn around...


Enter at your peril...!


As you know our theme for Christmas day this year is Santa.
So far we've had:

  • Santa Invites
  • Santa Gift Tags
  • Santa Candles
Well now it is the Santa Christmas Card...
I must give credit to Melanie Evans who's original design I discovered in "Cards & Crafts for Christmas Magazine" - I think the first Christmas special publication.

The Outside... Yes that is the same belt, well not the EXACT SAME belt, but you know what I mean.
Right about now is where you should expect to hear "The Stripper" music playing in your head...
As Santa slips off his belt... just a little tease of what is to come! (Yes I am warped!)
The Inside...

Let the therapy begin!!! And no I don't mean RETAIL THERAPY... unless you want to head along and do some shopping here!!

Saturday, December 3, 2011

Christmas Craft Challenge 2011 - Day 3

As if I wasn't already busy enough, I once again joined in some swaps through Crafting Passionz a networking group for New Zealand & Australian scrapbookers & crafters. Not one, but three swaps. So here is the first of these.


Crafting Passionz Swap - Christmas Cards
We each had to create two Christmas Cards to swap with the other participants.
I wrapped some cardstock in tinfoil then embossed it using my Cuttlebug machine and a Christmas Subway themed die. I then dabbed Adirondack Alcohol Inks over the embossing to add some colour. I mounted this on a coordinating cardstock and then directly onto the card itself.
I love the second set of cards for a number of reasons. The colour most definitely - I am a bright, clear colour kind of gal rather than a muted, pastel type of person. I love the Christmas Bauble on the front - they turned out better than I hoped for and more importantly... I love that it can be removed from the card and the ornament used each year as a Christmas decoration either on your tree or hung in the window to catch the light. 

  1. I used these Christmas Bauble die-cuts from Dusty Attic which you can get from my Scrap FX online shop
  2. I painted them with the Creative Imaginations Radiant Rain Paint Dauber in Gold and then Red 
  3. Then some heavy spritzing with Tattered Angels Glimmer Mist in Gold. 
  4. After waiting for the paint to dry... OK I used my heat gun to speed up the process... 
  5. I then affixed behind each bauble a small sheet of Angelina Heat Bondable Film using Helmar Tiger Grip Glue.I let this dry at least 30 minutes before trimming around the bauble as close as possible (about 1-2mm edge). Note - I used four different colours, one behind each bauble so they are unique.
  6. I then used my trusty heat gun again to shrink the Angelina Film. It shrinks as it is heated which in turn creates a myriad of amazing colours and colour swirls somewhat akin to the Aurora Borealis lights.
  7. I mounted some patterned & glittered paper onto some cardstock and then the card base.
  8. Punch holes in the top of the card using my Crop-O-Dile to feed the ribbon through.
  9. Finally attached the bauble using a bow (so it can easily be removed)
Here is a close up of each bauble before it was attached to the card.


Watch this space for another Christmas Craft project using the Angelina Film.
I will be running some classes in the new year on using the Angelina Film with some really cute Dusty Attic chipboard die-cuts, so if you are keen to find out more, please let me know and I can send you some details about the classes.