Showing posts with label Family. Show all posts

Monday, July 29, 2013

Book of the Undead

If you have been following my blog or even just looking back over previous posts, you will have seen a few posts on my step-daughter's Zombie themed 21st birthday.
In this post I wanted to share the mini album I created for her for one of her presents. Her main present from her Dad and I was going to be a little late, but I wanted her to have something from us on her birthday. In the past it has become standard party practice for us to pull out a visitor's book for everyone to leave us a message, but this time I decided to create something that was personal to her and that went along with the Zombie theme.
We gave it to her earlier in the day and then left it out at the party so that family and friends could leave a message in it for her. We will print out some pictures as well and then she can add these to her book along with any cards or other memorabilia she wants to keep.
The book includes three signatures of five leaves of Kraft carstock (10 double sided pages per signature) bound and stitched with bakers twine. I held the three signatures together by entwining the tails of the bakers twine in the spine as well as adhering them together with structure strips that I usually use in any construction pieces I make.
The cover was recycled cereal boxes covered in Kraft cardstock. I thought about using chipboard but settled on the cereal boxes as I wanted the album to have a flexible cover almost like a soft cover Moleskin journal as this would give it a more aged looked quicker.
I decorated the front cover with letters cut using the Cuttlebug "Olivia" alphabet dies. I ran all the letters through my Xyron 150 to make them self adhesive - my tool of choice for anything like this as I know they are guaranteed to stick without fail!! Once they were adhered in place to form the title "Book of the Undead" I smeared a light layer of Atelier Modelling Compound around and over some of the letters.
The back cover I also smeared with a thin layer of the modelling compound with my palette knife, then I used the end of the blade to dig scratches down the length of the album as if it had been used as a shield against attacking Zombies.
Once the modelling compound had dried I generously coated the cover all over with Lindys Stamp Gang Mists.
I used - Starburst Set - Sweet Treat - colours - Cadbury Milk Chocolate and Dark Chocolate Truffle; Starburst Set - Haunted Halloween - colours - Hags Wart Orange and Screamin' Banshee Black and Moonshadow Set - Blue Label - colours - Long Johns Silver, Golden Doubloons, Jolly Roger Red and Crow's Nest Copper.
I used the colours generously across the cover in patches of colour for texture. In some areas one colour was lighter than another and in some areas I purposely over-sprayed to create areas with drippage. The drips of blood were created by dripping Lindy's Stamp Moon Shadow - Jolly Roger Red mixed with Dylusions Cherry Pie Spray Ink.
I carried the blood drips into the signatures inside as well as adding some "blood" spatters on the odd page through the journal.
To finish off the cover I edged the spine and both covers as well as lightly accenting the die cut book title with Tim Holtz Distress Inks in Vintage Photo and Walnut Stain.
To add the pages throughout the journal, I distressed the edges of each page (quite vigorously) with my Tim Holtz Distressing Tool and Tim Holtz Tonic Scratcher Tool. I then applied generous amounts of watered down Tsukineko Walnut Ink and Terra Cotta Antiquing Solution which I left to air dry overnight and the next day. (I applied so much that the signatures were actually sitting in a pool of excess liquid which soaked up into the porous pages through the distressed edges over night).
Once everything had dried and the signatures were adhered inside the cover, I stamped images throughout the journal using various stamps... most of which were my recent purchases at SENZ. You can see more of them here. I then added a generous supply of journal blocks and tags which I had printed out from a number of digi-printables websites. These included Ephemeras Vintage Garden, Prima Marketing and How to Haunt Your House (Dot) Com. All images used were "freebies".
I really loved the end result so much that I could have quite easily kept it for myself. I did giver her the album, but may just have to make another one for myself.
Two versions of the front cover - taken with and without the camera flash. The picture above without the flash, shows more of the detail of the lettered and depth of the colour but the picture below taken with the camera flash just shows off all the brilliant luminosity of the micas in the Lindys Stamp Gang Mists and is probably a more true reflection of the actual colours. It shows the more "leathery" look the journal cover has.
This time the back cover with and without camera flash. Same as the front cover, more detail above, but more shimmer and a truer colour with the flash. The bottom picture also shows the "scratches" more clearly.
Just a couple of the pages from inside the journal. You can see the dripping blood above. The intense red from the Dylusions Ink Spray blended with the shimmer and depth of the Lindys Stamp Gang Starburst Mist to give me a really fabulous looking red blood which just stood out from the Walnut Ink and Kraft Cardstock.
This page really shows the beautiful distressing and aging I was able to achieve from the watered down Walnut Ink and Terra Cotta Antiquing Solution. I love the "water stained" look combined with the drippage, blood stains and stamped images. And then the printables images all fussy cut and edged with Tim Holtz Distress Inks just finish the book off.
Sorry only a couple of pages, as I only finished the morning of the birthday party... so didn't have much time for photographing it. I did take a video of it, but I'm not sure how clear that turned out as I used my web-cam. I'll add a link to my YouTube channel once I have posted the video.

Sunday, July 28, 2013

Zombie Cakes??

I know it's not strictly crafting is the paper crafting sense of the word, but this week I have been creating with flour and eggs and stuff... well more specifically pre-prepared frosting and a box of cake mix... did I mention I'm not really a baker??
This weekend is my step-daughter, Alysha's 21st birthday and she asked if I would make her birthday cake. As I mentioned in a previous post the theme for the party is "Zombies" so it had to be a theme appropriate cake design.
I trolled the internet for a few weeks and came up with some ideas of what I could potentially "attempt" to create.
Then when I was a SENZ I spoke to the lovely cake lady on the Absolutely Crafty site about my ideas and asked for some product suggestions. She suggested some GoBake Easy Frost and Flavacols with some Satin Ice Fondant. Being the experienced baker I am (NOT) I took in everything she said, bought what she suggested and went from there.
So here is the end result...
And with the candles added...
The cake was made in two pieces... and is two different types of cakes.
The "Tombstone" is a rice bubble and marshmallow cake - the "in thing" for cake toppers so I'm told. I made the rice bubble cake in a shallow tin and left it to set for an hour or so.
I cut the cake to shape and lopped off the bottom at an angle so it would automatically lean to one side as if the tombstone had been disturbed.
While it was setting I blended some white and black Satin Ice Fondant to get a marbled grey colour which I rolled out large enough to completely circle the entire rice bubble cake.
I then added some more black fondant to make a darker grey fondant to make a very poor "RIP" for the front. I then left this to dry for a couple of days, turning it over once to allow the back of it to dry as well.
The next day I made the second part of the cake. I bought a Betty Crocker Devil's Food Cake Mix which came with a prepared chocolate frosting, so made it up according to the instructions on the packet. I baked it in the same pan I had used for the rice bubble cake so that I knew they would be the same size.
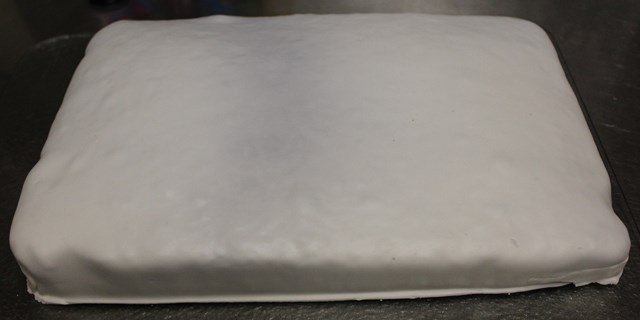
I rolled out some more of the Satin Ice white fondant and layered this over the chocolate cake.
Then I made up the GoBake Easy Frost mix I had bought at SENZ and added icing sugar and some green food colouring to colour it for the "grass". I tried not to blend the colour too much so that I would get some variations of green for the grass but when I piped it onto the cake that it all blended anyway turning from this vibrant green to a mushy pea green.
I piped the grass around the sides of the cake then started up onto the top of the cake as well. After a couple of loops of the top of the cake, I sliced the fondant down the length of the cake in a zig zag pattern and piped frosting onto individual pieces of fondant. I then folded back the pieces of fondant over itself leaving exposed chocolate cake in the centre. I repeated this step for the entire cake.
I spread the prepared chocolate frosting that came with the cake mix over the exposed cake as well as the "inside" of the peeled back fondant for the exposed dirt from the Zombie escaping the grave site.
To finish off the this bit of the cake, I lightly sprinkled milo powder over the chocolate frosting as well as a little sprinkling on the grass as if it was bits of dirt that had been spilled out.

Overnight I left the cake on the bench, though had to get creative to keep the cats and any sticky fingers from touching the cake without ruining all my hard work...
The morning of the party I put the two cakes together and then added the final touches. Some drops of GoBake Raspberry Flavacol to look like drips of blood and the candles.

I couldn't resist adding these candles as well as the "21" candles... they were just too perfect!!
My step-daughter loved the cake and that was all that mattered. It didn't taste too bad either.

Wednesday, July 17, 2013

In my spare time I made 30 coffins...

Well technically they were coffin cards... but that wouldn't have raised as many eye brows.
This month my step daughter Alysha turns 21. She decided very early on that she wanted a party and the theme of the party would be Zombies.
The invitations therefore needed to be appropriate to the theme, so after some googling for Halloween ideas, coffins were the stand out idea to try. As some invitations had to be posted out around the country, I wanted a flat coffin design rather than making three dimensional boxes which would probably be squished along the way through the postal service.
I found a pattern for a bi-fold card in a coffin shape. I wanted a little bit more design than this, so I adapted the pattern to a tri-fold card still in the same coffin shape. The folds are all on the long side of the coffin. As I had to make 30 invitations, I cut a template for the card from plastic so that all invitations would end up the same size and shape.
This is the card as it looked when taken out of the envelope. Each card was cut by hand from white cardstock. The outside of the card was given a wood grain effect using acrylic paint and Tim Holtz Distress Stains.
I cut small rectangles of recycled cardboard to size then covered them with metallic silver duct tape. I then ran these through my Cuttlebug using the Cuttlebug RIP Tombstone Embossing Folder from the combo set of the same name. I had to be very careful with the placement to ensure only the "RIP" was embossed in each instance. Each embossed plate was then run through my Xyron 150 before being adhered in place on the front of each card.
The left side of the card was opened and the right side then showed scratch marks to show the Zombie trying to escape from their coffin... cool touch I know. The scratches were made using my Tonic Studios Tim Holtz Retractable Craft Scratcher Tool.
Inside the right side of the card I adhered a small rectangle with contact phone numbers for the RSVP. Inside the card was a separate coffin shaped piece of kraft cardstock which had all the important details printed on. I utilised the SF Gushing Meadows Font to highlight the theme in a couple of places on the invite... doesn't it just look like dripping blood!! Both the insert and the RSVP slip were also edged in Walnut Stain Distress Ink.
The card opened out to show the outside and the wood grain effect. The wood graining was intentionally done to follow the line of each section of the card.
The inside of the card was vintaged using liquid Walnut Inks in Walnut and Terracotta which I watered down further to give an aged look. Close up the effect is that of white fabric which has become stained and aged through time.
I really love the finished look of these invites and both aging techniques as well. I will definitely be using these techniques again in other projects!

Sunday, June 16, 2013

Fancy A Cuppa?

Here's the second part of Mum's birthday present. I totally love this and very nearly kept it for myself.
I'd seen the lovely ladies on Artistic Creationz make these for a swap and I couldn't do it at the time they all made theirs, so I've just made mine (umm I mean Mum's) now.
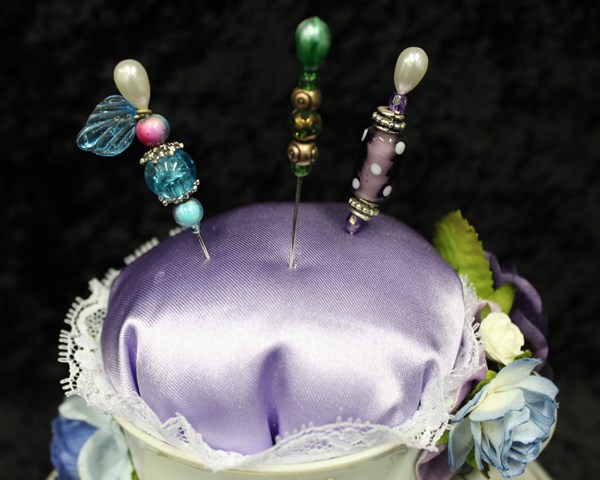
I picked up the cup, saucer and plate set at the local Hospice shop for only $5.00 (Don't tell mum I only paid that much for it). I loved the colours and knew they were mum's favourites as well, so figured I was onto a winner. I altered the cup set into a pin cushion.


I half filled the cup with some hobby fill. I cut a circle from some leftover mauve satin I had in my stash, gathered this up and  filled it with more hobby fill. I adhered the satin "ball" in the top of the cup then glued a length of ribbon around the rim of the cup. I added a length of mauve crushed velvet ribbon around the back of the cup and then liberally covered the area with flowers from I Am Roses... which will be available through my shop. I really love the way the cup turned out... and so does Mum, though she did complain that when she finally got it the pins I had added for the photo where not included so I may need to raid my stash to keep her happy (as a good daughter would do :-).

Friday, June 14, 2013

Birthday Book

I've had this project finished for a while now, but couldn't post the pictures as it was my Mother's birthday gift and I couldn't be sure whether or not she would see it. I finally gave Mum her belated birthday present last night (only a month and a bit late). She would have received it earlier but they've been telling us for three month that they were coming up to Auckland (from their home the other end of the country) and only just made it now.
I decided to make a couple of presents so will share them with you. Be sure to come back tomorrow to see the second part other present.
Mum asked for a book to record the family's birthdays in. (Yes she needed it as she keeps forgetting when the kids' birthdays are). The only condition was that I had to include everyone's birthdays BEFORE I gave it to her.
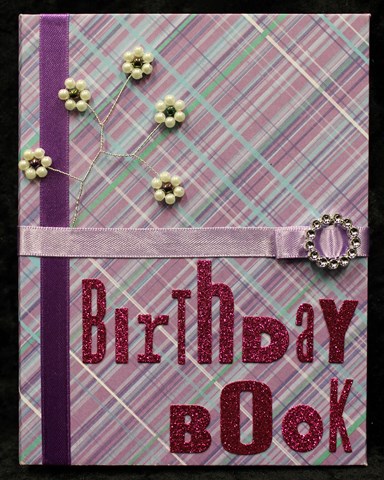
I made the cover from chipboard and covered it with patterned paper from the KaiserCraft "Magic Happens" paper pack. I added some ribbon to decorate the covers as well as a ribbon closure. 
I adhered a beaded flower stem I made onto the front to add a little blingy decoration and finished it all off with a glitter alphabet title... a woman can never have enough bling!!
I had to include this picture as it took me so many attempts to get the glittery look!!
The pages are made from C4 envelopes which I trimmed down to 6" (only about 1/4" chopped off). I then covered each side of the envelope with a selection of patterned papers from the pack which I had distressed the edges using Tim Holtz Distress Inks - Walnut Ink. The pages were adhered into the cover using structure strips as a flexible spine.
I cut a semi-circle pull tab in the top of each envelope to make getting the birthday list for each month out of it's respective envelope. I added a small journal block onto the front of each envelope that I had stamped with the month.
I cut cardstock to a size that would fit inside each envelope then printed onto both sides of the card the days of the month for the birthdays to be entered into. I finished these off with a corner punch before stamping a matching month name.

Friday, April 26, 2013

Layout - Dance


Project 2 - Dance Layout
I took these photos of my granddaughter Sonia-Marie dancing in the new dancing dress I bought her in mid-January of this year. She has always loved music and dancing and as a former dancer teacher I want to encourage her love of dance (and music and crafting and reading...). I found this outfit in K-Mart and just couldn't resist. As soon as we got it home she put it on and began dancing around in our (messy) lounge. She loves the pretty flowing skirt and the way it moves when she twirls around.
I just have to add... I really love the sports function on my Canon camera, especially for moments like this!!!
I started with a base of Bazzill White Cardstock. I placed a Butterfly Stencil from KaiserCraft in the bottom right corner and misted the area with Tattered Angels Mists - Abominable Snowman, Pink Poodle and Trunk Bay. LOVE... this colour combination and how delicate it looks with this stencil!!!
I cut some Teresa Collins patterned paper Posh: Butterfly Script and Posh: Posh Butterflies to size then distressed the edges with a edge distresser. I layered these onto the cardstock so as to highlight my lovely misted butterfly.
I added the photos which I had cropped tightly and then sanded to focus solely on my granddaughter. I overlapped them slightly so they would fit on the page better as well as adding a movement and flow across the page to better fit the theme of the layout.
I love this Dusty Attic chipboard scroll border and knew I wanted to add this to the page. I painted it with Tim Holtz Paint Dauber - Picket Fence, then covered this with a mixture of Making Memories Pink Lipstick paint and Reeves Iridescent Medium. I finished this off with a coat of Iridescent Medium on its own to give it a real sparkle (though it doesn't show that well when photographed).
I adhered the chipboard scroll in place with Ranger Glossy Accents along the left hand side of the layout.
I added some handwritten journaling with a black journaling pen then adhered some white glittered flowers I received in a swap from Gail in Australia. (A girl can not have enough bling or glitter in her life... especially a little "big" girl.) I added a self adhesive clear rhinestones into the centre of each flower.
To finish off the layout I added a title using Making Memories Mini Shimmer Alphas - Blue Metro.
Close up of the painted chipboard.
Close up of glittered flowers (they are just so cute!!!)

Saturday, April 13, 2013

Starting her early...

When my granddaughter was born I was at the hospital for the birth and being a good scrap booker I took a lot of photos as soon as she arrived and I haven't really stopped since.
As she has started to grow up we have bonded and are very close and she knows she can come to Nana for a cuddle or when she is upset (or Mummy has growled). We've spent a lot of time down in my scrap book studio doing painting and playing with paper from a very young age. I love sharing with her my love of crafting and the feel of glue and ink on my fingers.

Today I was working on some inking some cogs I had cut out of recycled cardboard with my Tim Holtz Alterations "Gadget Gears" die for an altered project I am working on at the moment. (Nearly let slip what the project was... caught myself just in time!!!)
Sonia-Marie came and joined me and stood watching for a few minutes as I rubbed the Tim Holtz Distress Ink onto the die cut using my foam applicator. She ducked and dived about a bit, then I moved over to one side so she could see better. Next thing I know, I have an extra hand on the handle of the foam applicator, helping me to put the ink on.
Not long after that I got the order of the boot, as someone who shall remain nameless, took over and did it all by herself. Not too bad for only four years old. Okay I may need to go touch some up, but the technique wasn't too bad. I couldn't resist taking a video of her to share with you.


Or to view the video on YouTube... please follow the link below.
http://www.youtube.com/watch?v=FZdS1TlzPnk

Thursday, February 28, 2013

Birthday Cards

I guess I should show that I have actually been doing some crafty type things and not just waltzing around only taking pictures here and there.

My three adorable nephews, Jordan, Dallas and Troy live in Nelson in the South Island and I live in Auckland in the North Island of New Zealand. That's quite some travelling distance for here, given that New Zealand is really not that big... I means let's be honest... you can travel from one end to the other in a day, including the three hour ferry ride between islands, if you pushed it and didn't travel with screaming or bored kids!!! I'm not even going to compare travelling distances across the US or through Europe, so I'm not complaining; I'm just saying, it's not like we see each other every other day or week or even month.

So when it comes to Christmas and Birthday presents I try to get a little organised as all three birthday's are in the first half of the year, and if I am organised then I can send their birthday presents when I send their Christmas presents. They are also usually the only ones that get hand made birthday cards because I am organised enough to think ahead. Alas I'm not usually organised enough to think ahead and do the same with everyone else I give cards to. I know... I'm slack. I'm a procrastinator from way back... and that seems to beat being a crafter 9 out of 10 times despite the best of intentions and no matter how many New Year's resolutions I make. I'm not the only one... I just don't mind admitting (yet again) I am less than perfect!!!

Anyway... the point of the rambling is that I was organised and I did make their birthday cards again this year.

Jordan was 7 in January... he's getting to be such a big boy now!!! I wanted to give him a big boy's card and encourage him to read (a definite favourite pass-time for me).
I had a "Totally Boy" die cut which I used as the base for a book mark. I've had it forever and never used it so decided it needed to come out of my stash and go to a new home. I double matted it on some metallic looking paper and some yellow cardstock from a 8" x 8" paper stash from way back when. Really love the torn edge on the metallic paper.
 I used some more coordinating paper from the 8"x 8" paper pack and wrapped it around the card then made a strip from the leftovers of the metallic paper. I adhered this strip at either end only so that I could slip the book mark inside it to hold it in place until it was removed to be used. I finished off the card with a bottle cap I've also had forever. I think everything for all three cards was from my stash... I have a big stash!!!
With the bookmark slipped inside the wrap around strip, this is what the finished card looked like.

Dallas is five this year and off to big boy school. His birthday is 29th February so he only has a 'real' birthday every four years so it is always a big deal.

He's into mechanical things so I couldn't resist using up some more of my stash - this time a selection of robot and space themed stickers and more paper from the same 8" x 8" paper pack.
Really loved that there were two colours of the same patterned paper in the pack. (There was also a green but it didn't suit the colour scheme lol). In hindsight... I should probably have placed the patterned papers the other way up, so the blue was the sky... but it still looks cool.
Added a dimensional "D" sticker to finish it off. Quick and easy.

And last but not least Troy will be three in May. I know that is a few months off... but his mummy can store his present just as easily as I can...
I had fun making this card. The patterned paper was from the same 8" x 8" pack (very versatile selection). I know he has a "Cars" themed bedspread and matching decor in his room. I had some leftover "Cars" themed dimensional stickers, complete with googly eyes, so as soon as I saw this paper which kind of looked like asphalt, I knew what I wanted to do.
I cut the paper down to fit onto the card base then sketched the road plan on the reverse of the paper. I then hand cut by eye a pattern to fit both the front and back of the card base but without covering too much of the fold.
I adhered the road in place using my Mega Runner by Teresa Collins and Xyron. It was so easy to follow the road pattern and much quicker than using photo splits all over the place. It also meant I didn't have to wait for the glue to dry, before I drew my road marking by hand. I finished off the card by placing the cars on the road as if they were driving around.

Three very simple cards all using leftover from my stash. Now.... who is next on my birthday list??