I guess I should show that I have actually been doing some crafty type things and not just waltzing around only taking pictures here and there.
My three adorable nephews, Jordan, Dallas and Troy live in Nelson in the South Island and I live in Auckland in the North Island of New Zealand. That's quite some travelling distance for here, given that New Zealand is really not that big... I means let's be honest... you can travel from one end to the other in a day, including the three hour ferry ride between islands, if you pushed it and didn't travel with screaming or bored kids!!! I'm not even going to compare travelling distances across the US or through Europe, so I'm not complaining; I'm just saying, it's not like we see each other every other day or week or even month.
So when it comes to Christmas and Birthday presents I try to get a little organised as all three birthday's are in the first half of the year, and if I am organised then I can send their birthday presents when I send their Christmas presents. They are also usually the only ones that get hand made birthday cards because I am organised enough to think ahead. Alas I'm not usually organised enough to think ahead and do the same with everyone else I give cards to. I know... I'm slack. I'm a procrastinator from way back... and that seems to beat being a crafter 9 out of 10 times despite the best of intentions and no matter how many New Year's resolutions I make. I'm not the only one... I just don't mind admitting (yet again) I am less than perfect!!!
Anyway... the point of the rambling is that I was organised and I did make their birthday cards again this year.
Jordan was 7 in January... he's getting to be such a big boy now!!! I wanted to give him a big boy's card and encourage him to read (a definite favourite pass-time for me).
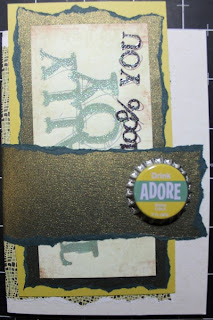
I had a "Totally Boy" die cut which I used as the base for a book mark. I've had it forever and never used it so decided it needed to come out of my stash and go to a new home. I double matted it on some metallic looking paper and some yellow cardstock from a 8" x 8" paper stash from way back when. Really love the torn edge on the metallic paper.
I used some more coordinating paper from the 8"x 8" paper pack and wrapped it around the card then made a strip from the leftovers of the metallic paper. I adhered this strip at either end only so that I could slip the book mark inside it to hold it in place until it was removed to be used. I finished off the card with a bottle cap I've also had forever. I think everything for all three cards was from my stash... I have a big stash!!!
With the bookmark slipped inside the wrap around strip, this is what the finished card looked like.
Dallas is five this year and off to big boy school. His birthday is 29th February so he only has a 'real' birthday every four years so it is always a big deal.
He's into mechanical things so I couldn't resist using up some more of my stash - this time a selection of robot and space themed stickers and more paper from the same 8" x 8" paper pack.
Really loved that there were two colours of the same patterned paper in the pack. (There was also a green but it didn't suit the colour scheme lol). In hindsight... I should probably have placed the patterned papers the other way up, so the blue was the sky... but it still looks cool.
Added a dimensional "D" sticker to finish it off. Quick and easy.
And last but not least Troy will be three in May. I know that is a few months off... but his mummy can store his present just as easily as I can...
I had fun making this card. The patterned paper was from the same 8" x 8" pack (very versatile selection). I know he has a "Cars" themed bedspread and matching decor in his room. I had some leftover "Cars" themed dimensional stickers, complete with googly eyes, so as soon as I saw this paper which kind of looked like asphalt, I knew what I wanted to do.
I cut the paper down to fit onto the card base then sketched the road plan on the reverse of the paper. I then hand cut by eye a pattern to fit both the front and back of the card base but without covering too much of the fold.
I adhered the road in place using my Mega Runner by Teresa Collins and Xyron. It was so easy to follow the road pattern and much quicker than using photo splits all over the place. It also meant I didn't have to wait for the glue to dry, before I drew my road marking by hand. I finished off the card by placing the cars on the road as if they were driving around.
Three very simple cards all using leftover from my stash. Now.... who is next on my birthday list??


No comments:
Post a Comment