Hello blog readers. Right now I would dearly love to be posting a tutorial or some pictures of what I have been creating but alas I can't. My laptop has decided to play dead on me. (Borrowing hubbie's laptop which just doesn't have half the stuff on it that I need - grrrr).
My friendly IT man is looking at her now in the hope that he can perform a minor miracle and get her working again.
Until then I am crafting - doing lots of experimenting, creating some samples for some classes I will be teaching soon and generally catching up on a lot of stuff that has been put aside because it's not that interesting. Things like cleaning my scrap studio.
Hopefully I will be back early next week to post again.
Thanks
Paula

Sunday, August 19, 2012


Monday, August 6, 2012
Charm Swap
Theme - Moulin Rouge
I was a little bit stuck as to what to create for this swap, then I found the large gold safety pins in an emporium shop and just knew I had to use them.
They each have a slightly different charm on the longest chin - L-R - Slot Machine, Dice and Hand of Cards.

I was a little bit stuck as to what to create for this swap, then I found the large gold safety pins in an emporium shop and just knew I had to use them.
They each have a slightly different charm on the longest chin - L-R - Slot Machine, Dice and Hand of Cards.

Sunday, August 5, 2012


Saturday, August 4, 2012
Flower Swap
Flowers for a swap on Crafting Passionz Forum.
Theme - Moulin Rouge
 For a step by step tutorial on how to make these rolled flowers - check here


Theme - Moulin Rouge


Friday, August 3, 2012
Corset Tag Swap
I've always wanted to do something like this. I love the look of real corsets, (so sexy!!) and they provide so much inspiration be it colour, shape, style or sexiness.
I've signed up to a swap through Crafting Passionz forum for a corset tag swap. We were given a link to Gracie Brown's blog "Sew Gracious". I loved the idea of a corset tag pocket rather than just the tag shaped liked a corset, so I used this as my own inspiration. Gracie includes a template on her blog, but I used my own template I've had for years.
For this swap I am making a corset shaped pocket with a mini tag inside. The corset front and back are both lined to make it easier to get the tag in and out as well as resolving some potential problems that might come out of my using a non-stretch fabric on the outside of the tags and it just looks smarter.
Ingredients:
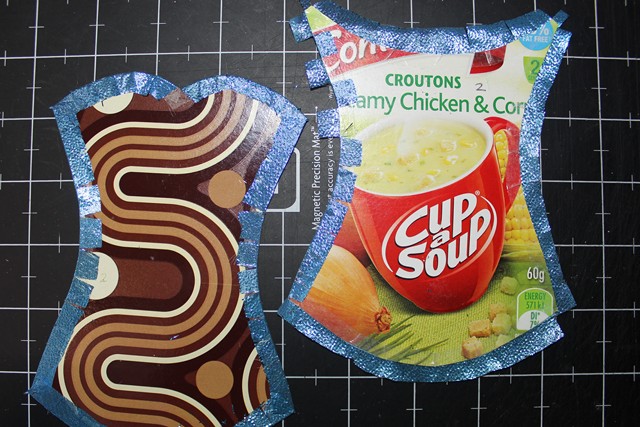
Cardboard - I used recycled packaging
Cardstock - black for backing
Fabric - I used leftover Japanese Tissue Lame from the flowers I made for another swap
Lace
Satin and Shear Ribbons
Bling
Double sided tape (lots of it)
Tacky Glue
Methodology:
As usual I am making a number of these Corset Tag Pockets, so I am doing things production line style. Each step is repeated for as many pockets as I am completing - in this case five. This also explains why the images show different colours :-)


 Clockwise from upper left - Pocket front (Gold); pocket back with tag completely hidden (Purple); pocket front with tag pulled out half way (Blue); pocket back with tag pulled out halfway (Gold) and back with tag completely out of pocket (Pink).
I've signed up to a swap through Crafting Passionz forum for a corset tag swap. We were given a link to Gracie Brown's blog "Sew Gracious". I loved the idea of a corset tag pocket rather than just the tag shaped liked a corset, so I used this as my own inspiration. Gracie includes a template on her blog, but I used my own template I've had for years.
For this swap I am making a corset shaped pocket with a mini tag inside. The corset front and back are both lined to make it easier to get the tag in and out as well as resolving some potential problems that might come out of my using a non-stretch fabric on the outside of the tags and it just looks smarter.
Ingredients:
Cardboard - I used recycled packaging
Cardstock - black for backing
Fabric - I used leftover Japanese Tissue Lame from the flowers I made for another swap
Lace
Satin and Shear Ribbons
Bling
Double sided tape (lots of it)
Tacky Glue
Methodology:
As usual I am making a number of these Corset Tag Pockets, so I am doing things production line style. Each step is repeated for as many pockets as I am completing - in this case five. This also explains why the images show different colours :-)
- Trace around templates or draw corset front and back shapes onto recycled cardboard as well as cardstock to be used as backing. If you are making a simple tag then you only need the front, but if you are making pockets like I am, then you need both front and back shapes.

- As I was making five Corsets, I matched up pairs of fronts and backs to get the best fit, then made any slight adjustments as needed so each pair matched perfectly for both the cardboard and the cardstock. At this stage I labelled each pair so I knew what went together in case they got separated and also so I could match the correct facing cardstock correctly as well.
- Carefully adhere double sided tape around the edges as follows:
- Both sides of the cardboard corset front and back - to hold the fabric firmly stretched across the "good" side of the corset as well as the wrap around of the edges of the fabric.
- The rough side of the cardstock corset front and back
- I used double sided tape for this step as my fabric is quite thin and liquid glue would have spread through the weave of the fabric, ruining the metallic look of it. It did take some time going around all the edges as listed, but once done the next few steps were relatively quick.
- Remove the backing on the double sided tape on the front of each corset shape. Carefully place this side down on your fabric making sure that the fabric is flat to avoid puckering or bunching up. Press the fabric down to firmly adhere in place.

- Cut the fabric around the corset shape leaving an edge of about 1/4" (6mm) to turn over to the other side of the shape.

- Evenly space snips around the turnover edge of fabric being sure not to cut into the cardboard. Remove each corner of the fabric so that you don't end up with too much bulk to fold over. Remove the backing for the double sided tape on the other side of the cardboard shape and press the slits of fabric onto the exposed double sided tape to adhere.

The corners have been remove and the edges around both shapes just snipped ready to fold over.
I've started to fold over the snipped edges. You can see on the back in particular the snips as I've folded over every second segment to show what I mean.

On any convex curves, the snips may end up over lapping as shown above.

On any concave curves, the snips will end up having gaps between them, as shown above.

All the snips have been folded over an adhered in place.

And the finished fronts and backs after the fabric has been adhered to one side.
- Adhere the backing cardstock over the back side to hide the turnover edge of fabric (so no one can see the secret of how you got the fabric to fit so well). You can just see a little of the blue fabric poking out in the bottom left hand corner.

- Repeat these steps so you have coordinated front and back to your corset. (I'm making five in total for the swap. I only have four colours of the fabric, so hence two golds).
- To make the pocket for the tag, adhere the sides and base of the corset front and back to each other, leaving the top open so you can slide the tag inside.
- Decorate your corset pocket as desired. I adhered a row of gathered lace around the bottom of the pocket (front and back). Then I added an over sized bow to the back just above the row of lace and some rhinestones accents around the upper edge.

The lace detail around the lower edge (front and back). I originally used double sided tape, but I've since had to use some tacky glue as the tape didn't hold as firmly as I would have hoped.

Over sized satin ribbon bow. I tied the bow then fitted the size to the width of the corset. It was adhered in place with tacky glue on the knot part as well as each loop of the bow. I then trimmed the end of the bow with a "V" to stop them fraying - and it looks cuter as well.

The rhinestone accents on the front and back.
- To finish these off, I made a simple tag with some left over cardstock. I adhered a sheer ribbon loop underneath a small "Moulin Rouge" vintage poster image I downloaded from the internet. I then tucked the tag in the pocket.

Tuesday, July 17, 2012
So Big, So Fast
After the "Baby Boy" layout I created for my nephew's baby album, I still had enough product left over from the kit to create a second layout.
This second layout is about showing how much Troy has grown already.
 There are a number of similarities between the two layouts. Not only are the products the same but I have also utilised a number of similar design elements in both layouts.
 The pages can either go into his album as a double layout, or just as individual pages. Either way will still look effective.
This second layout is about showing how much Troy has grown already.

- Distressed edge around each page
- Photo layout similar
- Use of diagonal design elements
- Grouped embellishments (flowers for the younger page, cogs for the older page)
- Journaling and title placement the same

Sunday, July 15, 2012
Baby Boy Layout
When I first started scrapping I started out as a consultant for TLC (Top Line Creations). Their products were based around collections which included kits and coordinated embellishments. I love kits for classes and workshops especially for those new to scrapbooking. They are also an excellent tool if you don't have a great deal of time for either scrapping itself or for hunting around your local scrapbooking store for the perfect products for your project.
As my scrapping style (and technical ability) have developed I've found that in general the TLC kits no longer suit my style of scrapping, though every now and then I use some that are left in my stash. I tend to be a lot more experimental in my scrapping these days and build my layouts with a broader range of products from a much wider range of manufacturers.
I pulled out one of the TLC kits for this layout. I had two adorable pictures of my nephew Troy which I wanted to put on an equally adorable layout for his baby album (even though he's now two!!) This kit came with two sheets of baby blue cardstock, two sheets single sided patterned paper and a 7" x 7" sheet of flocked, die-cut cardstock embellishments.
 I cut a 6" x 6" square from each of the patterned paper. I distress inked around each of the patterned paper squares as well as the sheet of cardstock using Tim Holtz Antique Linen and Walnut Stain distress inks. The patterned paper squares were then adhered to the cardstock in diagonally opposite corners with a slight overlap.
I rounded the corners of the photos just to soften them a little then adhered them so as to offset the patterned paper. The die cut title was self-adhesive, so I adhered this against the darker patterned paper.
The layout looked quite good just like that but I felt it needed some more softening (cos Troy was just so cute and cuddly and snuggley in these pictures), so I added some pale yellowy-cream flowers and highlighted them with dark brown rhinestones.
I added a small rectangle of manilla cardstock which I distressed the same as the cardstock and patterned paper. I hand wrote Troy's full name in a glitter gel pen and adhered this in close to the photos.
The final addition was a couple of small brown rub-on scrolls just to balance out the two opposite corners of the layout.
I love the final look of the layout. It's simple, yet soft but not overly feminine so my sister (a non-scrapper) won't think it's too girly.
As my scrapping style (and technical ability) have developed I've found that in general the TLC kits no longer suit my style of scrapping, though every now and then I use some that are left in my stash. I tend to be a lot more experimental in my scrapping these days and build my layouts with a broader range of products from a much wider range of manufacturers.
I pulled out one of the TLC kits for this layout. I had two adorable pictures of my nephew Troy which I wanted to put on an equally adorable layout for his baby album (even though he's now two!!) This kit came with two sheets of baby blue cardstock, two sheets single sided patterned paper and a 7" x 7" sheet of flocked, die-cut cardstock embellishments.

I rounded the corners of the photos just to soften them a little then adhered them so as to offset the patterned paper. The die cut title was self-adhesive, so I adhered this against the darker patterned paper.
The layout looked quite good just like that but I felt it needed some more softening (cos Troy was just so cute and cuddly and snuggley in these pictures), so I added some pale yellowy-cream flowers and highlighted them with dark brown rhinestones.
I added a small rectangle of manilla cardstock which I distressed the same as the cardstock and patterned paper. I hand wrote Troy's full name in a glitter gel pen and adhered this in close to the photos.
The final addition was a couple of small brown rub-on scrolls just to balance out the two opposite corners of the layout.
I love the final look of the layout. It's simple, yet soft but not overly feminine so my sister (a non-scrapper) won't think it's too girly.
Subscribe to:
Posts (Atom)