Tuesday, September 4, 2012

Halloween Stick Pins

Let me just say up front that I am no fan of spiders. I hate them, though I am getting a bit better. I can at least get rid of them (unlike my darling hubbie) though my chosen methods may be somewhat strange and unusual.
So given my aversion to the darling little creatures (read eeekk and ugggghhh) why was my first idea for a Halloween stick pin a spider?
Having come up with my brilliant idea, I then had to envisage how to actually make them. A few nights mulling in my sleep and I had the answer.
Now that I have made them I think they have a cute creepiness to them and even if it sounds like I'm getting a big head, I really do love the way they finished up. Perfect for Halloween.


Don't they look so creepy up close LMAO

Sunday, September 2, 2012

Burnt and Folded Flowers

September is the month for Halloween swaps on Scrappers Obsessionz Forum in preparation for the real thing the following month. For a change I'm starting early so I don't have my usual end of the month panic.
I'm doing a number of swaps so am mixing things up a bit, but here is the first of two flowers that I am creating for one of the swaps. They are a combination of a couple of things I seen around the blogs and tutorials together with a touch of my own.
You may have seen flowers created with a burnt edge. I created some red flowers for last month's swap which you can see here, though I didn't show you a tutorial. These red flowers had a hand-scalloped edge which I burnt to create the fluted look of petals. This time around I just used full circles and burnt the edges of these, before combining in a flower making technique using folding to create the petals. This burnt edge gives the flowers a unique look and combined with my own "different" folding technique (just to be different), I really love the way the flowers have turned out.
The step by step is shown for some red and black flowers I created using a 2" circle, where as the green and black "Halloween" versions I made for the swap were created using a 4" circle.

1 - Start by cutting strips of your chosen fabric slightly wider than your circle size. As my circles are going to be 2" in diameter, I cut my strips of organza fabric 2 1/4" in width. I've chosen to make two-colour flowers, but you could make single colour or four-colour flowers if you preferred.
2 - Cut your strips into squares. I found it easier to cut from squares rather than the strips - just more manageable. I didn't measure any of this just eye-balled things using my circle templates. I made plastic circle templates from $2 shop place mats using my Fiskars Circle Template. Each flower has two layers of four petals so for a two colour flower you need 4 squares of each colour.
3 - Hold your circle template on top of each fabric square and use this as a guide to cut out each circle. This meant I didn't have to trace each circle. You don't need to cut out each circle perfectly as the edge is going to be burnt so you will soon hide any small imperfections. (The picture below is half cut out).
This picture shows the progression - square of fabric plus template then cut out circle. Followed by a big pile of cut out circles. From two single strips of fabric I was able to make two flowers. I used 18" wide florists organza which I picked up cheap at an emporium shop for $3.00 per metre. From one metre of a single colour you could probably make four, maybe five two layered 4" flowers or at least 10 - 12 of the 2" flowers.
4 - Now for the fun bit - burning the edge of the circle using a tea light candle. A word of warning - the fabric will burn VERY QUICKLY using the open flame so you need to be very careful. Less is more. Start further away from the candle than you think and gradually moving closer. You will soon find out the optimal distance from the candle to achieve the burnt edge look. One final word of warning - be sure to keep your fingers well away from the flame as well as the melting fabric - both are VERY HOT!!
You can always re-burn the edge if you feel it needs more of an edge but you can't un-burn a hole!!
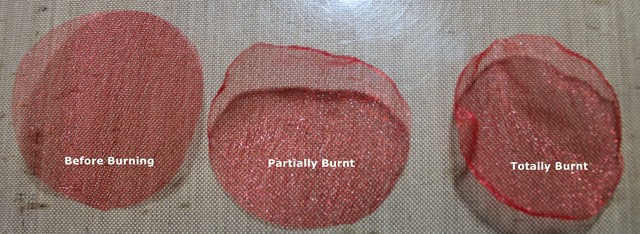
Here is a progress shot. Circle before, part way through and after the burning process. You can see quite a noticeable difference to the burnt edge. The fibres melt into each other so that the fabric doesn't fray. The principle is the same as sealing the end of a nylon rope using a match. (Gong back to my old Girl Guides days there!!)
I found I would burn an entire circle in about five or six twists above the flame. I got into a rhythm of swirling a circle over the flame, moving my fingers, swirl the next section, move fingers etc until the entire circle was done. Once I got my rhythm sorted, I could burn an entire circle in about ten seconds - very quick process. 
And now a big pile of circles with burnt edges. The circles will all end up different shapes and sizes as there is no way to control exactly how each edge will react to the process.
5 - Now for the folding and putting together part of the process. Fold each circle in half. This is also where you consider how to hide any accidental over burns so no one notices them. (People will never know!!)
6 - This is where my folding differs from all other tutorials I've seen. Most fold the semi circle into quarters. For my flowers I folded the semi-circles into 1/8ths folding in each side to make a quarter flower. (If that doesn't make sense, then hopefully the pictures show what I mean.) Fold in one side...
Then fold in the other side, so you have a "seam line" in the middle which is the two folded edges.
7 - Adhere the quarter circle, point in and folded seam line facing down. For my base I cut out 1" circles from recycled cardboard (tissue boxes) which I covered in glue dots. For the larger green and black flowers I didn't use the cardboard just a circle of double sided adhesive.
8 - Repeat steps 5 - 7 with second circle. As my flowers are going to be red and black I alternated the colours of the petals.
9 - Complete the flower layer with two more petals.
10 - Each flower has two layers so repeat step 5 - 9 again for the second layer.
11 - Finish the flower by stacking one layer on top of the other offsetting them by 1/8th of a turn and hold together using a coordinating brad. The offset disguises the fact the petals may not align completely and it makes them look so much cooler.
For the green and black flowers, I didn't have brads big enough for the look I wanted to I cut out circles of recycled cardstock and adhered double sided adhesive to each side. On one side I adhered black glitter, then I peeled the second side off the back and adhered this directly onto the top of the flower.
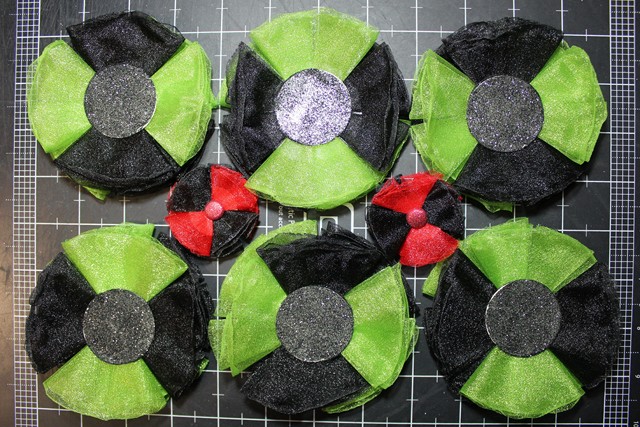
Below are the finished flowers. The green and black used a 4" diameter circle and the red and black used a 2" diameter circle. I really love the baudy, garish "Halloween" colours of all these flowers. I hope the other girls in the swap love them as much as I do.


Friday, August 31, 2012

Technique Tutorial - Salt Inking

I read a message on one of the forums I follow or it might have been facebook and someone asked how to do salt inking. As I'd never heard of it myself, I did some googling and browsing and came across some instructions and images so decided to give it a bit of a go.
The techniques are really easy unless you are impatient like me. If you are impatient, this may not be the technique for you. You can't speed it up, cos it just doesn't work. You do need to leave these overnight (or sometimes longer) to dry naturally. Of course drying time may differ Winter compared to Summer or if you are really desperate and want to rack up a power bill leaving the dehumidifier running all night long.
  • In a nutshell... colour your tag or project with your choice of colourant - more on this later. (I would suggest a cardstock rather than light weight patterned paper).
  • Spritz with a little (or a lot) of extra water.
  • Sprinkle wet cardstock with choice of salt - I tried natural sea salt and table salt
  • Leave to dry (this feels like forever!!!)
  • Gently brush off salt when colourant is dry
  • Admire the end result
Colourants:
Although I called the tutorial Salt "Inking" it is possible to do this technique with a number of different colourants.
  • Inks - distress ink is ideal as you can spritz this with water to blend as much as you like
  • Water colour paint
  • Colour wash/mists
Salt Type:
Depending upon which type of salt you use, the end result will differ. I used both table salt (non-iodised but not sure if this would make a difference) and natural sea salt, though many of the tutorials recommended Kosher salt. I didn't use this as I could find it in our local supermarket.
Table salt - the end result was finer more detailed, so more subtle than the effect created by the sea salt.
Sea salt - created a bigger, bolder effect
Both worked well on all colours tested, though some results were better than others. 
For each picture below table salt on left and rock salt on right.
Adirondack colour wash Stream and Lettuce. 
I was a little impatient with the rock sale version on the right - you can see I smudged the colouring when I brushed the salt off. Note to self - be more patient!!!
I really like the way the table salt version shows almost a natural crystal formation... kind of looks like I'm performing a science experiment and successfully trying to grow bacteria in agar LOL.
Distress Inks - Mustard Seed, Crushed Olive and Faded Jeans.
I was surprised at the effect of the salt particularly on the Mustard Seed (yellow). Around where the salt crystals sat the colouring became quite a bit darker than the colour of the ink. I love the effect on the blue (Faded Jeans) on the rock salt version (right).
Distress Inks - Walnut Stain and Fired Brick.
I was a little disappointed in what happened with the table salt as the effect really isn't all that clear however I love the intensity of the rock salt version. I can see this looking really cool if you were trying to DIY an animal print look. May have to try that soon... hmmmmm.

Thursday, August 30, 2012

Red Stick Pins Swap

To go with my red flowers from here, I also made some red themed stick pins for another swap on the same forum.
I've just re-watched the first four Twilight movies so I had to play homage to them with my Twilight stick pin. I love the mini cube beads and the contrast to the mini round beads.
I created a very simple matchbook to put the stick pins in. (I refuse to send stick pins without some kind of protection for the sharp end). Just red cardstock with a simple strip of washi tape to accent the front of the matchbook.


Monday, August 27, 2012

Red Flowers Swap

I've signed up for another couple of swaps this month over at the new forum at Scrappers Obsessionz. This month the theme was "Red".
Every time I hear the word "red" I can't helping thinking of my favourite speech from one of my favourite movies - Kinky Boots. 
To quote Lola "Burgundy. Please, God, tell me I have not inspired something burgundy. Red. Red. *Red*. *Red*, Charlie boy. *Red*! Is the color of sex! Burgundy is the color of hot water bottles! Red is the color of sex and fear and danger and signs that say, Do. Not. Enter. All my favorite things in life."
This month's flowers...
There are three people in each swap group and we each create three flowers.
 These are a sheer organza with a burnt edge.
 These are lace with a painted cardboard button and rhinestone accent.
These are tulle and ribbon with rhinestone accent.

I have to say I'm finally starting to enjoy making flowers, though the perfectionist in me still thinks they need more work.

Sunday, August 26, 2012

Halloween Classes

I mentioned in an earlier post that I was working on some samples for classes I will be teaching at Caz Dezign's October Scrap Retreat. The classes notice has gone out so I wanted to share the finished products for the two classes I will be teaching.

Class 1 - Halloween Tag
Class 2 - Halloween Layout - using Tag from Class 1
Participants will be able to choose what colours they wish to use for their tag and layout so if they don't wish to make Halloween themed, they can do something else.

Wednesday, August 22, 2012

Scraples

Yes I know there is no such word as "scraples", because I just made it up out of thin air, but that is what I have been doing a lot of lately. With my laptop out of commission, I've had a lot more time on my hands, so I've been creating some "scrapbook samples" = scraples; for a class I will be teaching in October at Caz Design's October Scrap Retreat.
You will have to come back later to see the finished samples for the class I will be teaching... can't let it all out of the bag today... but I can show you some of the other scraples I created along the way.
A lot of these were testing colour combinations, or trying to create colours that I didn't have the exact colour of ink as well as showing a variety of different techniques. So enjoy and let me know which is your favourite.
Distress Ink (Weathered Wood, Old Paper, Crushed Olive, Faded Jeans); Adirondack Colour Wash (Stream, Lettuce)
Distress Ink (Antique Linen, Tea Dye, Vintage Photo, Walnut Stain); Antiquing Solution (Walnut Ink, Terracotta)
Distress Ink - Mustard Seed, Faded Jeans, Fired Brick
Distress Ink - Mustard Seed, Stormy Sky, Faded Jeans
Distress Ink - Mustard Seed, Fired Brick, Dusty Concord
Image stamping L - R: Royal Purple Staz-On; Jet Black Archival Ink; Coffee Archival Ink