Here she is... yet to be named... my altered torso, revealing her Steampunk Theme. Her base is a paper mache torso I purchased from Spotlight. You can see the treatment I gave the blank base in this YouTube video on my channel.
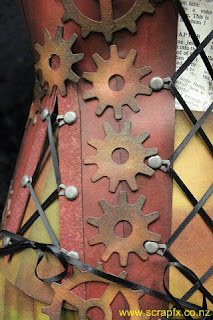
The outfit she wears is made of patterned paper and recycled cardboard with loopy brads and ribbon for the laced enclosures.
This angle had to be my favourite as it shows all the highlights of the design... the pleated skirt, the lacing, the die-cut gear decorations...
Front on showing the intricate lacing and die-cut gear details.
The bodice was all hand pieced in a technique very akin to making a bodice from fabric. I started with a paper pattern to get the shaping and sizing of each piece then cut the respective pieces of bodice pattern from the patterned paper I had chosen. Each piece was then individually coloured and highlighted using Tim Holtz Distress Inks before being adhered in place.
You can see some of the intricate piecing involved in making the fitted bodice above.
The skirt was first pleated by hand, then coloured with Tim Holtz Distress Inks. The edges of each pleat were also individually accented with Walnut Ink Distress Ink to accentuate the pleats.
Pleating was the only way I was able to get a "fitted" look to the skirt using a material that essentially had no give in it. Paper doesn't stretch like fabric nor does it really confirm to a particular shape without some kind of manipulation or adherence.
Close up of the pleating in the skirt.
The front and side lacings, were all done with Nickel Loopy Brads and a 4mm black ribbon. It took some time to get all three lacing gaps even yet taut enough to hold the bodice in place.
The side lacings were both accented with "V"s of Grunge Board to provide additional stability while utilising the flexible properties of the grunge board.
The cog accents were all die-cut from recycled cardboard packaging using the Sizzix Tim Holtz Gadget Gears die. They were then individually coloured using Tim Holtz Distress Inks to coordinate with the colours used in the bodice and skirt.
The detailing of the cogs was carried around the sides of the torso as well.
I love the way this picture shows off the shaping that I was able to achieve even using paper all through the shaping of the paper pieces. I also am really pleased with the way this photo in particular shows off the shading of each piece of paper from the Distress Inks. As well as the colouring aspect, the Distress Inks not only gave the paper a leathery feel and improved the flexibility of the paper while trying to manipulate it around the curves of the torso but it also seemed to make the paper stronger and less prone to tearing than it had been before the Distress Inks were added.
The final cog on the lower edge in the centre back of the bodice.


3 comments:
Wow looks amazing sweetie - well done!! B
Looks fabulous Paula. Awesome job!!
Fantastic work!
Post a Comment