Over the past few years I have watched as many of my scrapping and crafting friends have deftly announced their word of the year for the coming year. The word that will be their inspiration, their guide, their goal, their focus for the coming 12 months. I've never been so inspired or motivated to have my own "Word", until now.
This is kind of a new thing for me. I've no idea what to expect, what to plan, what form it will take, how I will record what this word means to me... nothing, just the word itself. I have faith that this is the right focus for me. I have faith that this is the right time for me to follow this creative journey. I have faith that things will all fall into place.
My word for 2012 is "Organisation".
Some who know me might question my choice... I know I have, several times. I'm an accountant, my day to day working life is all about organisation, I love systems, love methodologies, love organisation so surely this seems a bit defunct, a bit pointless, surely??
If I be honest with myself, and you... and in the past I have been (sometimes too honest)... despite my love of organisation at work, in my family life, my business, my scrapping, my home... it's all more like complete and utter chaos.
I'm not sure if it's a delayed reaction to what has been going on in the world around me the past 12 - 15 months or the impending threats of world annihilation (depending upon whether or not you agree), but being organised and prepared for whatever life is going to throw at me, seems really appropriate for the coming year.
Along with all my crafting bits and pieces, new products, tutorials and everything I throw at you, I will be sharing some of my organisational tips, tricks, trials and tribulations. That and whatever and however I end up recording all of it.
I've taken my first step already...
I've signed up to the 52 weeks to an organised home - weekly challenge through Home Storage Solutions 101. The schedule is up on their website for all to see, so you know what to expect when - I like this already. It also means that you can plan and alter as appropriate to suit your needs... for instance if you don't have kids or your kids are too old for you to clean their room, then you can always substitute these weeks for something else.
There is a link to the right (way down the bottom) of my blog so if you want to know more then by all means please go take a look.
There are going to be lots of other organisation and storage ideas over the next twelve months so be sure to check back for some inspiration.

Friday, December 30, 2011


Monday, December 26, 2011
Christmas Craft Challenge 2011 - Bonus
We've had a fantastic Christmas Day. Lots of presents, lots of lovely food... including my first ever turkey I've ever cooked with the most amazing Cranberry and Cashew Stuffing.
But I wanted to share the Christmas Cake my niece Kerry made for us.
 The Santa on top is a ceramic candle holder for a tea light candle.
 The Santas on the side are scrapbooking embellishments which were removed prior to eating.
 As you can see below, Kerry made the cake with two different layers. The top was a Vanilla Sponge while the bottom layers was traditional fruit cake. We could have a piece of either layer or both.
 I just love the look on my Granddaughter Sonia-Marie's face as she watches Kerry cut the cake.
But I wanted to share the Christmas Cake my niece Kerry made for us.


Saturday, December 24, 2011
Christmas Craft Challenge 2011 - Day 24
It's Christmas Eve at last and this is the final official blog post for the last day of the Christmas Craft Challenge for 2011.
We're having a bit of a sleepover here tonight. Our eldest, her partner and daughter are staying over so we get an early start on the present unwrapping in the morning.
I kind of threw together a layout for today's challenge. I started it a few days ago and have spent a couple of days trying to copy this photograph without success... well that is to say I'm still not happy with the end result.
I'm also not that happy with the photographing of the layout... maybe I'm just a perfectionist - the red patterned paper has a foil finish that you just can't see well enough to keep me happy LOL.


Materials used - Bazzill Cardstock - White; Patterned Paper - DCWV & Tim Holtz Craft Resist Pack - Christmas; Chipboard - The Dusty Attic; Glitter Letters - KB; Tim Holtz Distress Inks; Radiant Rain Paint Dauber; Tattered Angels - Glimmer Mist; Photo Splits
We're having a bit of a sleepover here tonight. Our eldest, her partner and daughter are staying over so we get an early start on the present unwrapping in the morning.
I kind of threw together a layout for today's challenge. I started it a few days ago and have spent a couple of days trying to copy this photograph without success... well that is to say I'm still not happy with the end result.
I'm also not that happy with the photographing of the layout... maybe I'm just a perfectionist - the red patterned paper has a foil finish that you just can't see well enough to keep me happy LOL.


Materials used - Bazzill Cardstock - White; Patterned Paper - DCWV & Tim Holtz Craft Resist Pack - Christmas; Chipboard - The Dusty Attic; Glitter Letters - KB; Tim Holtz Distress Inks; Radiant Rain Paint Dauber; Tattered Angels - Glimmer Mist; Photo Splits
Friday, December 23, 2011
Christmas Craft Challenge 2011 - Day 23
Today is also known as my first official day of Christmas Holidays. Ahhhh my bed felt so good this morning as we two enjoyed a few quiet moments together without the rude interruption of an alarm telling me to get up once, twice, three times. I could have stay with you even longer this morning has it not been for the noise of visitors and the pressure of a morning routine.
But now for the blog...
I've seen this idea in various guises in lots of places, especially Pinterest and I've always loved it and thought i was a really great idea and more importantly thought it would be lots of fun... and after all that's what life is all about.
I'm talking of course about Themed Photo Booths. I've seen them designed for weddings, engagement parties, birthdays and of course Christmas. Not only is there usually a setting but also Photo Booth Props and this is today's craft item.
I've made some Santa beard props for our family photos. As everyone will be wearing their Santa hat, as per the request in the Christmas Day invite, I just know the perfect prop is of course a beard and mustache. I saw some links on Pinterest to various different ideas so I have created my own using what I had at home.



But now for the blog...
I've seen this idea in various guises in lots of places, especially Pinterest and I've always loved it and thought i was a really great idea and more importantly thought it would be lots of fun... and after all that's what life is all about.
I'm talking of course about Themed Photo Booths. I've seen them designed for weddings, engagement parties, birthdays and of course Christmas. Not only is there usually a setting but also Photo Booth Props and this is today's craft item.
I've made some Santa beard props for our family photos. As everyone will be wearing their Santa hat, as per the request in the Christmas Day invite, I just know the perfect prop is of course a beard and mustache. I saw some links on Pinterest to various different ideas so I have created my own using what I had at home.
- Firstly I sketched some mustaches, cut them out and measured them against my face for sizing. (Sorry no templates as I free-handed this)
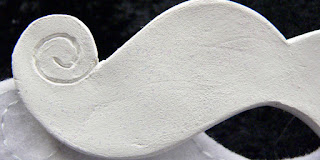
- I figured I needed this to be a solid base to hold everything together so I used some Paper Clay to form the mustache. Mold it and shape it into a flattish sheet then trace around the patterns from the first step. I use an awl with a fine point to trace them, then cut around the pattern using a craft knife.
- Repeat for the second pattern (if you want a second mustache/beard set) then leave to dry overnight. The humidity was so bad here that on day three I put them into the roof access and they finally dried out overnight.
- Sand them down to remove the sharp edges from cutting them out and reshape them a little to look more natural. I used three grades of sandpaper... just from my scrapbooking distressing stash.
- Dust them well with a hard dry-brush then paint with a double layer of white gesso on both sides as well as the edge. For a more magical look paint a double layer of clear glitter paint on the front only. (Unfortunately this didn't show up very well in the photos - must be my poor lighting in here again.)
- Sketch a pattern for the beard making sure to trace the bottom edge of the mustache to get the fit right. Fold the paper in half before cutting to make sure both sides ended up looking the same.
- Pin the pattern onto white felt and cut out.
- As an optional extra decorate your beards with hand or machine stitching. Although it is a decorative extra, I did this also to stop (hopefully) the felt being stretch or torn during all the photos.
- Glue the beard to the bottom of the mustache. I used about 1/4" crossover and used Helmar Tiger Grip for the glue. It was dry in about 2 hours, though I made sure I did this a couple of days before the props are needed just to allow some curing time.
- Finish by attaching a wooden dowel or stick to use as the mask handle. I cut mine 30cm long and attached it with the Helmar Tiger Grip Glue, though you could also try a hit glue gun for both of these steps. Unfortunately you can't see the dowel very clearly as it's inside the bottle I'm using as my display tool.


Put the props inside your photo booth and let the fun begin. I will be posting some of the photo booth pictures both here and on Facebook, so be sure to check back after Christmas Day to see my nutty family and how much fun we all had with our Christmas Day Photo Booth.
Thursday, December 22, 2011
Christmas Craft Challenge 2011 - Day 22
Dear Santa and blog readers,
I've tried to be a good girl, honest...
I've tried really hard to hold off on blogging this Christmas Craft item, honest...
But you see I finished work today, so I feel the need for some kind of a celebration...
So I can't wait any longer, I just HAVE TO share this Christmas Craft!!
My Christmas Angel
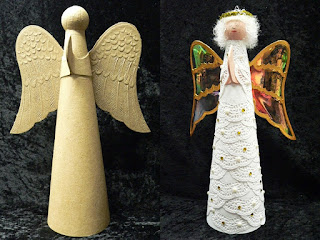
When I bought my 3D Christmas Tree I also bought an Angel on sale. I've wanted a nice handmade angel for our Christmas Tree for a while now, but I've never been able to find one that I really loved so I figured if I didn't love one of my own creations, then I would have no one to blame but myself!!!
I found this strange beige little angel in desperate need of some tender loving care and a splash of colour. (Where is Gok when you need him??)
 See she was quite pretty, if a little plain.
First thing I did was clip her wings. Well actually I did more than clip them, I removed them completely... though it was only temporary, she does get them back at the end of the make-over!!
 The wings sans body. In case you haven't guessed (cos I forgot to take a before photo), I then drew a pattern around the wings and cut out the bits I didn't want. I left a frame about 5/16 on an inch (6mm) around the outer edge as well as the bottom of each layer of feathers.
 The next step was to then paint the wing frames in a couple of coats of gold acrylic paint. I left the paint to dry overnight (yes instead of using the heat gun, for a change) between the layers of paint. I was concerned that using the heat gun too much might warp the frames hence my enforced patience.
 After the gold paint has dried. Now doesn't she look so much better already... and that's without a head or body!!
While the paint was drying on the wings, and so it didn't feel like I was sitting watching paint dry and doing nothing... I also painted the body of my fair maiden. I painted her head to toe in a couple of layers of white gesso... with a KaiserCraft foam brush of course. These truly are a Godsend to every crafter and you can pick them up very reasonably. I have three different sets in my eCommerce shop.
 Then I painted her head and hands with a skin-toned acrylic paint (but you probably guessed that).
I had seen the technique I ending up using to decorate her on a Christmas Tree and thought it looked beautiful, so I decided to "do it my way" and tried the same thing on my Angel.
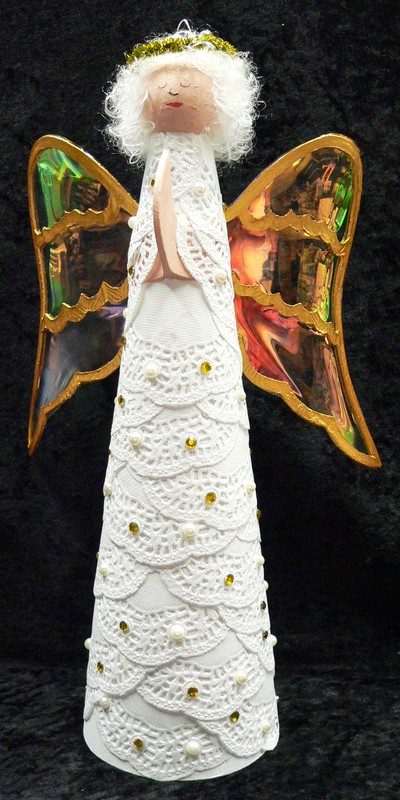
I trimmed small paper doileys (from the $2 shop) in half. I adhered them in place around the body using a glue dot on either side of the doiley. I didn't worry about putting the glue dot on the die-cut part as I knew I would be layering the doiley halves on top of each other for complete coverage. It only got a little tricky around the arms... mainly it was just a matter of placement around the arms though as the body became significantly smaller near the head, I did have to trim the doiley halves a little and add some additional cuts to aid the shaping at this point. It was pretty much a feel it as you go type of thing.
 The next thing I did was add some hair. Now I need to point out that this was the FIRST time I have ever used doll's hair. I had intended to use long ringlet curls, much like my own hair (on a really, really, REALLY good hair day) but alas the dolls hair wouldn't do what I wanted it to do, so I after re-reading the instructions, I resorted to short, frizzy but still curly hair.
I think I prefer this, because as soon as it was done, I couldn't help thinking how much she looked like my late Nana - Lillian Mary Wilson (nee Walker). So from the time she received her hair, she also received her name. She is the Angel Lillian.
 And then of course I added a demure look on her face simply with acid free journaling pens.
 By now the wings had well and truly dried so it was time for their special treatment. If you've been following my blog during my Christmas Craft Challenge you would have seen my earlier blog about the Christmas Card swap I did and the non-traditional card with the removable bauble ornament. I used the same technique for my Angel's wings.
I cut some Angelina's Heat Bondable Film to the size of the wings.
Glued the film in place using Helmar Tiger Grip Glue and left this to dry overnight. This may have seemed like a long time, but I wanted to be sure.
I trimmed the film down to a 1 - 2mm overhang around the outside edge of the wings.
Using my trusty head tool, I heated the Angelina's film until it was taut across the frame of the wings.
I was not expecting the film to pull and re-shape the wings as much as what it did though I love the end result even more than I expected. The extra shaping just adds another design dimension that I love so much.
 I re-attached the wings to the body once again using the Helmar's Tiger Grip Glue and left her to dry. Then I added a halo which I made from a gold metallic pipe cleaner.
The final step was to add a little bling by dotting individual pearls and gold rhinestones on each of the roses in the die-cut part of the doileys forming the Angel's dress.
 And one final photo opportunity - in her pride of place on top of the Christmas Tree in Nana Lucy's lounge (my mother-in-law who lives with us).
 Since this photo was taken, the number of presents underneath the tree has increased significantly!!!! Unwrapping presents, may take all day!!
{Edited - Added Before & After Photo}
I've tried to be a good girl, honest...
I've tried really hard to hold off on blogging this Christmas Craft item, honest...
But you see I finished work today, so I feel the need for some kind of a celebration...
So I can't wait any longer, I just HAVE TO share this Christmas Craft!!
My Christmas Angel
When I bought my 3D Christmas Tree I also bought an Angel on sale. I've wanted a nice handmade angel for our Christmas Tree for a while now, but I've never been able to find one that I really loved so I figured if I didn't love one of my own creations, then I would have no one to blame but myself!!!
I found this strange beige little angel in desperate need of some tender loving care and a splash of colour. (Where is Gok when you need him??)

First thing I did was clip her wings. Well actually I did more than clip them, I removed them completely... though it was only temporary, she does get them back at the end of the make-over!!


While the paint was drying on the wings, and so it didn't feel like I was sitting watching paint dry and doing nothing... I also painted the body of my fair maiden. I painted her head to toe in a couple of layers of white gesso... with a KaiserCraft foam brush of course. These truly are a Godsend to every crafter and you can pick them up very reasonably. I have three different sets in my eCommerce shop.

I had seen the technique I ending up using to decorate her on a Christmas Tree and thought it looked beautiful, so I decided to "do it my way" and tried the same thing on my Angel.
I trimmed small paper doileys (from the $2 shop) in half. I adhered them in place around the body using a glue dot on either side of the doiley. I didn't worry about putting the glue dot on the die-cut part as I knew I would be layering the doiley halves on top of each other for complete coverage. It only got a little tricky around the arms... mainly it was just a matter of placement around the arms though as the body became significantly smaller near the head, I did have to trim the doiley halves a little and add some additional cuts to aid the shaping at this point. It was pretty much a feel it as you go type of thing.

I think I prefer this, because as soon as it was done, I couldn't help thinking how much she looked like my late Nana - Lillian Mary Wilson (nee Walker). So from the time she received her hair, she also received her name. She is the Angel Lillian.


I cut some Angelina's Heat Bondable Film to the size of the wings.
Glued the film in place using Helmar Tiger Grip Glue and left this to dry overnight. This may have seemed like a long time, but I wanted to be sure.
I trimmed the film down to a 1 - 2mm overhang around the outside edge of the wings.
Using my trusty head tool, I heated the Angelina's film until it was taut across the frame of the wings.
I was not expecting the film to pull and re-shape the wings as much as what it did though I love the end result even more than I expected. The extra shaping just adds another design dimension that I love so much.

The final step was to add a little bling by dotting individual pearls and gold rhinestones on each of the roses in the die-cut part of the doileys forming the Angel's dress.

{Edited - Added Before & After Photo}

Wednesday, December 21, 2011
Christmas Craft Challenge 2011 - Day 21
Warning - Today's Blog comes with a warning. Anyone with a delicate disposition should not proceed any further. Do not read this blog in front of children or anyone with a faint heart.
It contains not only stripping but partial nudity (of a sorts).
Turn around...
Go back now...
OK, don't say you weren't warned!!
Here it is at last... my 2011 handmade Christmas Card.
Final chance to turn around...
Enter at your peril...!
As you know our theme for Christmas day this year is Santa.
So far we've had:
 Right about now is where you should expect to hear "The Stripper" music playing in your head...
As Santa slips off his belt... just a little tease of what is to come! (Yes I am warped!)
 The Inside...

 Let the therapy begin!!! And no I don't mean RETAIL THERAPY... unless you want to head along and do some shopping here!!
It contains not only stripping but partial nudity (of a sorts).
Turn around...
Go back now...
OK, don't say you weren't warned!!
Here it is at last... my 2011 handmade Christmas Card.
Final chance to turn around...
Enter at your peril...!
As you know our theme for Christmas day this year is Santa.
So far we've had:
- Santa Invites
- Santa Gift Tags
- Santa Candles
Well now it is the Santa Christmas Card...
I must give credit to Melanie Evans who's original design I discovered in "Cards & Crafts for Christmas Magazine" - I think the first Christmas special publication.
The Outside... Yes that is the same belt, well not the EXACT SAME belt, but you know what I mean.

As Santa slips off his belt... just a little tease of what is to come! (Yes I am warped!)


Tuesday, December 20, 2011
Christmas Craft Challenge 2011 - Day 20
Great, simple and yummy craft today, thanks to my lovely friend Glenna who showed me these a few years ago... it's taken me until now to finally make them!!
Reindeer Candy Canes
 Sorry he started off a bit camera shy on his own... didn't want to look the camera straight on, kept blinking every time the camera went... bit of a diva really!!! Of course once he was joined by a few friends... and then a few more, he became a bit more cooperative!!


 Candy Cane (pre-wrapped in hygienic plastic).
Wrap the pipe cleaner around the hook then twist a couple of times to hold in place.
Wrap each end around a pencil then stretch out and up to give the reindeer horns.
Attach buggle/boggle/wobbly eyes. I used Tiger Grip Glue.
Leave to dry.
Optional extra - you can add a mini pompom for a nose. I didn't have any so they are all noseless.
Reindeer Candy Canes


Wrap the pipe cleaner around the hook then twist a couple of times to hold in place.
Wrap each end around a pencil then stretch out and up to give the reindeer horns.
Attach buggle/boggle/wobbly eyes. I used Tiger Grip Glue.
Leave to dry.
Optional extra - you can add a mini pompom for a nose. I didn't have any so they are all noseless.
Subscribe to:
Posts (Atom)