Day 12 - Recycled Star
After I had finished making my recycled heart, I knew I wanted to make something else, as it was so simple to make, yet looked really cool. I knew I had some tissue leftover from the box I had decorated for my friend Jude's Secret Santa Swap. A star covered in stars sounded perfect!!
The steps to make this were exactly the same as the steps for the heart, except for the flower embellishment. Instead I added a simple jute bow to match the string. I didn't have a star template, so I hand drew this. To make it less obvious that I didn't use a template, I made it a stylized design with uneven star points... no one will ever know!!!
Showing posts with label Re-purposing. Show all posts
Wednesday, December 12, 2012
Monday, December 10, 2012
Christmas Craft Challenge - Day 10
Day 10 - Recycled Heart
Okay... that title doesn't sound the best, though it is the truth. Everything I used to create this heart, was recycled...
I cut the inside heart first from the flap off a packaging box. I used the inside edge of the smallest Fiskars heart super template. Once I had cut it out, I pulled off parts of one side of the heart to give it an instant aged and distressed look. I also added some Tim Holtz Distress Ink - Walnut Ink around the edge of the heart. The trick to this was using a mini cotton wool ball to do the inking. This enabled me to do both the hills and valleys of the corrugated cardboard.
I then cut a larger heart out of recycled cardboard (cereal packet) using the outside edge of the same heart template. I coated one side with Elmer's glue then adhered some scrunched tissue paper.
Once this was dry I cut around the heart, leaving an edge of about 3/4" to fold over to the back side of the heart. I glued this down as well and left it to dry overnight.
I adhered the corrugated heart to the middle of the tissue wrapped heart. I also inked the outside edge of the tissue heart to coordinate with what I had done on the internal heart.
To finish, I punched a hole in the top of the heart and added a string to hang the heart. Finally I added a wire flower with a bead accent I made for another project, but then didn't use.
Friday, October 26, 2012
Recycled Rubbish - Desk Organiser
I'd forgotten about the down side of buying a new laptop... not the reloading of all the software, I knew that was going to take a bit of time, but the updating of all the software especially the operating system.
The downloading bit quite happily happens in the background, you don't even notice it most of the time. It's when you go to shutdown and it tells you that the laptop needs to install all the updates that the boring bit REALLY begins!!
In case you didn't know... your laptop, or computer, will not complete the shutdown process until it has installed all the updates. All very well in theory until you realise that the mere 70 odd updates it needs to install are actually going to take OVER NIGHT to complete. And during this installation process, you can't do anything with your laptop... at all, other than keep checking to see if it's done!
And if you are really unlucky, then the same thing happens the following night as well... I must have been really unlucky to have this happen two nights in a row.
The good news... is that not having access to my new laptop, meant I didn't spend all night on it updating and downloading software or playing games on Facebook or googling tutorials or Pinterest.
Instead... I got to spend two fun-filled nights cleaning up the studio. Slow progress I will admit and I still have a long way to go, though I did make considerable progress and I was happy with what I achieved.
When the aforementioned cleaning got a bit boring (as it does), I did squeeze in some crafting to complement the cleaning process.
I'm not a coffee drinker... and my apologies to all of you who are, but I hate the stuff. I don't like the taste or the smell and have been told (to my face) that I actually make a horrible coffee. Of course it may have been that I was making sure I didn't get asked to make any ever again, but you never heard that from me.
I drink, when I'm cold, hot chocolate, chai lattes or soup.
Which means I have managed to accumulate quite a collection of used hot chocolate containers as well as various other containers... like Pringles tins.
I've seen some really cool samples where crafters have recycled tins into desk organisers, so I figured why couldn't I use my stash of chocolate and Pringles tins... same thing really.
I decided upon a collection of three chocolate tins and two small Pringles tins as I figured these would all be a great size for pens, scissors, tools etc on my scrap desk instead of them lying in a pile as they were at the time.
I selected patterned paper from the Basic Grey Eva Collection which I had in my stash. I covered each tin in a different patterned paper.
I then adhered a coloured raffia ribbon around the top and bottom of each tin to hide the silver edges and give the collection of tins a unifying element.
Finally I adhered the tins to each other in the position I wanted them, using double sided foam adhesive. This filled in the slight gaps between the tins. (Each tin had a slight lip top and bottom so there was a thin gap between the sides of the various tins even though the top and bottom were touching.)
Then I filled them up with all the stuff from my desk. I was surprised at how much "stuff" I was able to fit in the tins.
I grouped like things together - for instance all my scissors in one tin with some other bulky tools, pens in another tin, my most frequently used liquid adhesives in another tin.
And then the extra things I added were a selection of small bulldog clips onto some of the tins. I frequently end up with notes on small pieces of paper, layout ideas and I need one place to put them all until I decide what to do with them.
Here are pictures to show you the finished desk organiser:
Organiser from the front
Organiser from the back
Organiser looking down on angle
Organiser looking straight down
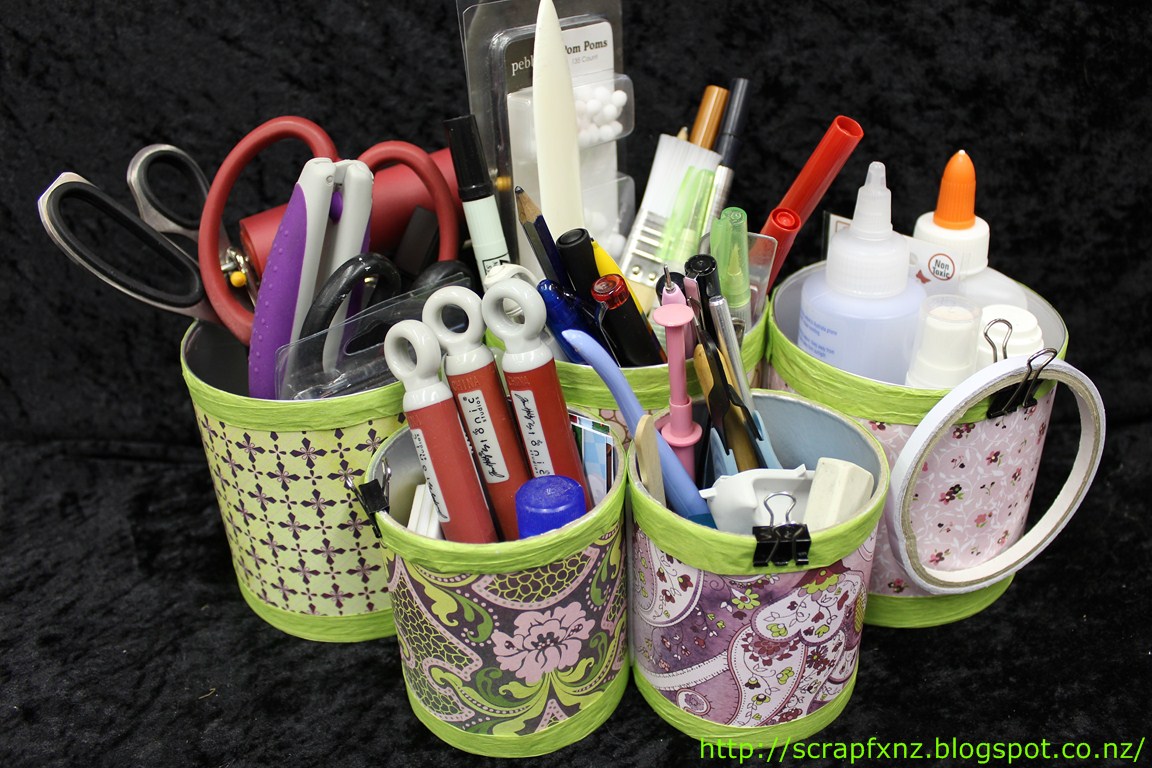
All filled up with my tools and bits and pieces - front
All filled up from the back
Doesn't that look smart and so much neater and tidier and it's much easier for me to find what I'm looking for.
Friday, December 16, 2011
Christmas Craft Challenge 2011 - Day 16
Following from yesterday's craft... here is a more complicated version.
As the insides of the tubes were already white, I only painted the outside of the tube (bonus) though I did do four layers of paint - two white and then two clear with crystal glitter.
Once I had stuck the loops altogether... following the instructions from yesterday, I then added some bead combinations for something more spectacular.
Thursday, December 15, 2011
Christmas Craft Challenge 2011 - Day 15
I'm a great proponent of recycling, reusing and re-purposing especially in my crafting. (I'm not so hot with sorting my recycling for the rubbish collection, but nobody's perfect).
I don't know about anyone else but in our house we seem to go through toilet paper like its going out of fashion which means of course that we end up with what can seem like thousands of toilet roll tubes.
I've made toilet roll albums in the past... these still need some work for me to be happy with the end result but then I know I am a perfectionist.
During one of my many, many, MANY trolling the internet sessions on Pinterest I saw these really cool ornaments. Not only do they use up the toilet roll inner tube, but these are a great craft for kids to try.
- Find some toilet roll inner tubes without any toilet paper dregs stuck on them. It just looks tidier on the end result.
- Squish the tube flat - I used my fingers for the first bit of squishing, then finished off with a bone folder to clean up the fold. For kids you can just use finger pressure.
- Measure along the tube to get six even slices of tubes. I made my slices 15mm wide and ended up with about 10mm left over... bin this bit.
- Cut along each line to give you six rings. Re-shape these slightly to give you an oval shaped ring.
- You can then colour the rings inside and out if you want to. I painted mine both inside and out. If you are doing this craft with kids you could try fingers painting or crayons instead... just make sure you have plenty of protective paper down. Using acrylic paint, the first was well dry by the time I finished the last one.
- Now the fun of putting them altogether. The trick to making this step easier... paperclips!!! Use the paperclips to hold two rings together, joining all the rings into a six-pointed star. Using the paperclips you can keep rearranging the loops until you get the loops linked the way you want.
- Once you are happy with where the joins will be... remove one paperclip noting where the tape needs to be. Then adhere double sided tape in exactly the spot where the paperclip held the two loops together. I used Wondertape. It is incredibly tacky and will hold anything together. I found it was perfect and I didn't have to wait for the glue to dry... always a bonus as we all know how impatient I am!!!
- Repeat step 7 to join all six loops together.
- Finally add a small hole using your trusty Crop-O-Dile into what will be your top loop. Thread through some string to use to hang your ornament with. I did find I needed to add beads to stop the threads passing through the hole in the top of the loop. For a kids version, you could just tie the string around the top loop rather than worrying about a hole.
Subscribe to:
Posts (Atom)