Showing posts with label Inspiration/MOJO. Show all posts

Tuesday, June 18, 2013

Art Journal Page - Be The Light

I did this page for a MOJO Challenge on Artistic Creationz Facebook Group. We could make whatever we wanted so long as it included the phrase "Be the Light".
I decided to make another art journal page, again using what I had learned from Donna Downey, but this time I did some extras on the page as well.
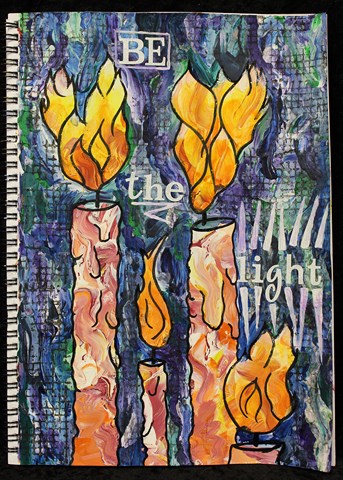
The finished page... "Be The Light".
Given the title, I knew before I started what image I wanted. I didn't know exactly how it would look, but I knew it would be some kind of candle.
I started with a background of warm acrylic paints - yellow, orange and red with white gesso. I drew the candles and flames in with charcoal pencil and then coloured the background with a cool palette of acrylic paints - light blue, dark blue, green, teal and purple, together with white gesso.
Once this was all dry I went over the charcoal lines with black Indian Ink, including adding some more detail to the candles for melted wax drips as well as the flames.
I wasn't happy with the colours of the flames, they didn't really look like flames. I added some water soluble oil pastels in white, yellow, mustard, orange, and red. I blended these with my Zig water brush and then my finger to get more the colouring I wanted but without hiding the underlying blending of the acrylic paints.
To darken the background so the "light" would stand out more, I stamped using a Glitz Distress Stamps - grid stamp and black acrylic paint dauber. I stamped by hand rather than using an acrylic block as this allowed me to stamp only in the areas I wanted around the candles and flames, rather than in distinct rectangles.
I added the title using some white glitter alphabets from Making Memories and highlighted these with some white acrylic paint. I was trying to have these quite an opaque white, but when it had dried the underlying colours had tinted the white a little and I do prefer this to the stark white.
Close up of the flames. The underlying striations in the acrylic paint show through really really well, particularly in the bottom of this uppermost flame.
This flames looks considerably brighter with the water soluble oil pastels added than they had looked with just the acrylic paints. 
I really like the way that some of the gesso appeared to have a "cracked" paint look in some places, as seen in this close up of one of the candles.
Close up of the grid stamped with the black acrylic paint, using the Glitz Distress Stamp. I also love the way this cool palette looks like paua (abalone) shell, particularly with the black highlighting.
You can see the underlying colours coming through the white "light beams".

Sunday, July 1, 2012

Update - Finishing What You Started...

Since my earlier blog post I've managed to finish...


  • Circle Journal pages to be sent on to Australia
  • Altered Box for swap, including several hand made items inside (as well as some store-bought)
Just need to take photos of them both, before posting them off to the respective recipients. I will post photos soon - isn't it exciting!!

Tuesday, June 26, 2012

Finishing what you start...

I'm finally in the mood and have the time to do some crafting. (Having your full-time job cut down to one day a week does that for you). The mojo and inspiration are kind of there and flowing - at least better than they were at the beginning of the year. My scrap stash is so ginormous that I can't use that as an excuse so I have been doing some creating.
I've started several mini albums, some OTP projects, and have sorted some papers and photos for layouts. I also have a really, really long "To Do List".
The problem now is finishing off all my started and half done projects. I seem to have so much on the go at the moment that nothing is getting finished.
What tricks and steps do you implement to finish off all your partly done projects?

Monday, March 26, 2012

More Colour Warm Ups

I really enjoyed creating my last lot of colour warm ups so I decided to do some more a few days later. This time I went for a cool colour palette as I have some layouts to create for my nephew's baby album (even though he's nearly 2). I figured doing something in blues would get me into a more masculine mood.


A bit of playing later and these are what I came up with... no layouts but at least I'm feeling a little more creative. I might need to invest in a stop watch or an egg timer so I move to the actual creating from the warm ups.


L-R
1 -  Acrylic Paints & Glimmer Mist - I created this one after the third one so just used the paint still on the spatula. This meant the paint was thinner and pre-mixed before I spread it on the card. Once dried spritz with glimmer mist. I ended up with some really well patches of glimmer mist so I moved the cardstock to get some drips. 
2 -  Acrylic Paints & Glimmer Mist - This was really just cleaning off the excess paint from the spatula. In some places it is thinner but in other thicker layers.
3 - Acrylic Paints & Glimmer Mist - Small blobs of 3 or 4 different colours of acrylic paint placed at intervals up and down the paper. Then disbursed using a mini spatula (credit card or the like) moved the length of the cardstock in a loose waving movement. Once dried spritz with homemade mist and glimmer mist. The homemade mists were also dripped on the cardstock to give the distinctive circles.
L-R
1 -   Radiant Rain Paint Dabbers & Glimmer Mist I removed the dabber from the Radiant Rain and painted the cardstock directly using a Zig Water Brush. Once dried spritz with three different glimmer mists and colour mists. 
2 -   Acrylic Paints - Small blobs of 3 or 4 different colours of acrylic paint placed at intervals up and down the paper. Then disbursed using a mini spatula (credit card or the like) moved the length of the cardstock in a loose waving movement. I passed over the cardstock several times, filling in any gaps to add colour. Kind of looks like waves.
3 -  Acrylic Paints & Glimmer Mist - This was really just cleaning off the excess paint from the spatula. Once dried spritz with three different glimmer mists and colour mists.
L-R
1 -    Acrylic Paints - Small blobs of 3 or 4 different colours of acrylic paint placed at intervals up and down the paper. Then disbursed using a mini spatula (credit card or the like) moved the length of the cardstock in a loose waving movement. I passed over the cardstock several times, filling in any gaps to add colour. I used the light green to lighten the blues which were looking quite dark. The lighter colour range seemed more suited for a page for a young child.
2 -   Acrylic Paints - Small blobs of 4 different colours of acrylic paint placed at one end of the paper. Then spread in a straight line using a mini spatula.  Once dried spritz with glimmer mist.
3 -  Acrylic Paints - This was really just cleaning off the excess paint from the spatula. The olive circles were blobs from a paint dabber.
L-R
1 - Heat embossed powder, Acrylic Paint Dabber, Glimmer Mist - I stamped the cardstock with clear embossing ink, dusted with white embossing powder which I heat set. I dabbed the entire card with black paint dabber and wiped it down with a tissue especially over the embossed part. Finally I spritzed with two contrasting glimmer mists.
2 -    Heat embossed powder, Radiant Rain Paint Dabber, Glimmer Mist - I stamped the cardstock with clear embossing ink, dusted with clear embossing powder which I heat set. I painted the entire card with Radiant Rain paint using a Zig paint brush and wiped down the embossed part with a tissue. Finally I spritzed with glimmer mist.
3 -   Heat embossed powder, Acrylic Paint Dabber, Glimmer Glaze and Glimmer Mist - I stamped the cardstock with clear embossing ink, dusted with white embossing powder which I heat set. I painted over the embossed image with Glimmer Glaze then  wiped down the embossed part with a tissue. Finally I spritzed with glimmer mist. 

L-R
1 - Metallic Acrylic Paints -  Small blobs of 3 or 4 different colours of acrylic paint placed at intervals up and down the paper. Then disbursed using a mini spatula (credit card or the like) moved the length of the cardstock in a loose waving movement. As I created this one second, the paints had partly pre-mixed on the spatula. I love the mixture of the copper and pewter paints.
2 -    Heat embossed powder, Acrylic Paint - I stamped the cardstock with clear embossing ink, dusted with white embossing powder which I heat set.  Small blobs of 3 or 4 different colours of acrylic paint placed at intervals up and down the paper. Then disbursed using a mini spatula (credit card or the like) moved the length of the cardstock in a loose waving movement. Then wiped down the embossed part with a tissue. 

Monday, March 19, 2012

Birthday Card

It was my granddaughter's third birthday last Friday though we had her party on Saturday. I made her a very simple card using one of my colour warm up creations from yesterday's post.
I cut out the number 3 from the painted tag. Attached it with foam squares then went around the edge of the number using Kindy Glitz so it would stand out from the background paper.
I wrapped all her presents in brown paper (I love using it as it is so versatile). On one of the larger flat presents I added a very quick Princess collage using some foam stamps and paint.
Given the paper was going to get ripped off in a fairly short time frame I just did something really simple (but cute lol).

Sunday, March 18, 2012

Colour Warm Ups

I finally sat down and did some warm ups before my crafting which turned into my crafting because I was enjoying just playing with my craft supplies.
Some things turned out better than others (way better) and some things... well lets just call them part of the learning and creative process LOL.
L-R
1 - Radiant Rain Paint Dabbers - This started off looking quite cool... then I added the brown which came out a little faster than expected... so it blobbed... learning curve LOL
2 - Radiant Rain Paint Dabbers - More brown problems though I really like the end result of the brown over the top of the pink especially how the pink shimmer shows through adding texture.
3 - Radiant Rain Paint Dabber - Layered gold, pink & brown... and once again brown overtook everything (you would think I would have learnt by now). The brown was too overpowering so I spritzed with water then dried with a scrunched tissue. Finished with spritzed gold mist. I really like the effect of adding the spritzed water to add texture and an unexpected depth of pattern. Will be trying this again!!
L-R
1 - Glimmer Glaze - Thicker lines are using the hard brush inside the cap of the bottle. The thinner lines are using a Zig Water Brush. When added thicker and darker, the glazes have a real shine to them compared to ordinary paint.
2 - Glimmer Glam (Cookies & Cream) - I bought this purely because of the name LOL. This has a beautiful delicate white pearlescent look with the specks of "chocolate" sprinkled throughout - totally delicious, almost good enough to eat!!
3 - Radiant Rain Paint Dabber, Adirondack Paint Dabber, Glimmer Mist & Homemade Mist - All kinds of bits and pieces here!!!
L-R
1 - Radiant Rain Paint Dabbers & Glimmer Mist - Dab and pull with the paint dabbers. Once dry mist. Interesting and unexpected outcome of the misting was the re-wetting of the paints caused some bleeding of the colours - quite a nice effect.
2 - Acrylic Paints & Glimmer Mist - Small blobs of 3 or 4 different colours of acrylic paint placed at intervals up and down the paper. Then disbursed using a mini spatula (credit card or the like) moved the length of the cardstock in a loose waving movement. Once dried spritz with glimmer mist. Be sure to look at tomorrow's post on the card I used this piece on.
3 - Radiant Rain Paint Dabber, Adirondack Paint Dabber, Glimmer Mist & Homemade Mist - Covered half in paint dabber, half in Radiant Rain paint dabber then misted. At first I thought all my hard work disappeared with the misting but it's grown on me and I really like the subtle textures created by this colouring.

L-R
1 - Acrylic Paints & Glimmer Mist - Create waves as above. I love these Autumn colours. This will definitely make another appearance at some stage.
2 - Acrylic Paints - Create waves as above. I love these "Mardis Gras" colours and the interesting texture they created as they blended together. Don't ask me how I did it because I'm not 100% sure. If I can recreate it, you can be sure  will share.
3 - Acrylic Paints & Glimmer Mist - Create waves as above but this time in a tight waving movement. I didn't like the end result here, the waves weren't distinct enough but I did like the texture look comparing thin layer of paint to the thicker layers of paint. Needs more experimentation.


I enjoyed not having any pressure on me to create anything in particular and lets be honest that is one of the key reasons for this warm up process. Sure the purpose of the exercise is to warm up your creative mood/thinking/process before you get into creating "proper" but it is also about freeing yourself of preconceptions, fear of making a mistake and just letting yourself just go for it in your creating.

Friday, March 16, 2012

DIY - Tags

After watching Dina's video about Warming Up before creating (part of the Creative Jump Start Video Blogs Series on Nathalie's Studio)and having seen all of Tim Holtz amazing tags I went on the hunt for luggage tags so I go give it all a go myself, instead of just using scraps of cardstock as I usually do. I was also thinking ahead for all the Tag Swaps I sign up for.


I went to Warehouse Stationery and found small tags (I think #5 size). Would you believe 5 tags for nearly $6.00 - I nearly died!!!


Being financially challenged at the moment, I decided there had to be a way to still get the same result but for considerably less money.
I was able to find cream coloured cardstock (same colour as the buff/manila luggage tags) A4 210gsm 12 sheets for $6.00. From each sheet I can get 3 #8 size tags as well as having left over strips for smaller tags, journaling blocks and the like. The equates to 36 tags per pack of cardboard - so less than $0.20 per tag - considerably cheaper than over $1.00 per tag.
The quality of the card is nice and the only other requirement was a little of my time to cut them up. The entire pack took all of 20 minutes to cut up, once I had determined the optimal cutting pattern to get the size of tags I wanted.


Ranger Products sells tags in sizes #5 and #8 - which to little ole New Zealander me meant nothing. So a little internet searching and I was able to get the sizes for each of the tags.
#5 - 2 3/8" x 4 3/4"
#8 - 3 1/8" x 6 1/4"


I am already to do some Creative Warm-ups before I start crafting over the weekend. I will share some of the results over the next few days. Be sure to come back and check out my "Exercising"!!

Thursday, March 15, 2012

Inspiration Bombs 2

So recapping from my last post...
Feeling a bit funky (not in a good way)...
Lots of crafty ideas, got the MOJO (I think)...
But no idea where or why or how to start...
I'm not sure that my problem is a "Scrap Block" issue more of a needing to jump start my creative juices issues.


So I'm looking for some Inspiration Bombs!!!


Did your mother ever tell you... "If you didn't hurry up and clean up your room", "go do your homework", "wash the dishes" or any one of a hundred other things; then she threatened to put a bomb under you???


Well that's what I'm looking for... some figurative bombs to inspire my creative juices to start flowing and get my crafting going. {So poetic}


I know there are lots of ideas out there. Everyone has them. I also know there are some dated, overworked, over hashed, been around forever ideas and I also know all that not all of them work for everyone.


I've heard of...

  • Scraplifting someone else's work
  • Scraplifting your own work
  • Taking a challenge
  • Following a sketch
  • Using a journalling jar
  • Changing projects
  • Changing scrapping style... net curtains instead of drapes... (Carrie that's for you)
But what other new, refreshing, different, inspiring ideas are out there? 
What works for you?

What has been an epic fail... and what has been an epic success?


At the start of the year I signed up for a series of free video blog classes being run by Nathalie Kalbach from Nathalie's Studio (Click on the link for free tutorials) along with a number of her incredibly creative and artistic friends. The first video in the series was by Dina Wakely from Dinastamps.

Dina talked about the warm-up process that athletes follow before they exercise, practice and compete and compares that to crafters. She posed the question... why don't we (crafters) also warm up before we create in order to get us more productive? Why don't we warm up before getting down and getting dirty (so to speak) to get us more into the mood to be creative? 


Being a proponent of "new age" things such as visualisation and motivational talking my first response was doh - why didn't I think of this? (I should also add that as a former competitive tap dancer and tap teacher... this should have been second nature to me... obviously it has been TOO LONG since I last had my tap shoes on.)


Do you warm up before you get into getting crafty?

Tuesday, March 13, 2012

Inspiration Bombs

I'm in a bit of a funk at the moment. Given I've recognised that and admitted it; I'm hoping that means I'm on the road to recovery or at least plateauing instead of continuing to meander along meaninglessly.
I also recognise that I need to do something about it, so the problem is now what to do.
I'm guessing and playing at self-therapy here, that in order for me to "Un-Funk" myself I need to sort out what is causing the "funkiness". I also need to find some inspirational triggers, methods, or just inspiration bombs to help me achieve this.
At the moment I have a long list of creative projects on my "TO DO" list and I dare say I'm not the only crafter who will admit to that. So I can safely say that my problem is not what to do or even how to do it, it's more of a problem of want to do it. I just don't seem to be able to decide where to even start.
It's not that I have lost my MOJO, because I do have ideas on what to do... lots of them. Designs, techniques, page layouts all ready to be tried. It's more that I have lost the impetus to even start to create.


So my lovely friendly and incredibly helpful friends, followers and blog readers... I put this question to you... how or why or where do you find the inspiration to start creating?
Are you...

  • A PLANNER - You decide what you want to work on. You plan it, design it, sketch it first, come up with the colour scheme, paper selection, pick your photos, embellishments and then set about pulling everything out to create
  • A DOER - You just pull out photos, tools, cardstock, patterned paper, adhesive, embellishments, paints, whatever and start creating
  • A FOLLOWER - You scraplift, maybe with your own added flare or a direct copy of what you are scraplifting. You follow a sketch, a challenge with a list of requirements or instructions. You use a kit which has everything you need except consumables like adhesive and inks.
  • Or are you a combination of all three of these?
Does your methodology change depending upon the project or do you like to work in one particular way so you stick with the good old tried and true?

I'd really like to get your feedback on this, so please leave a comment or a link.