Sunday, April 28, 2013

Fifty {Two} Shades of Grey - Week 17

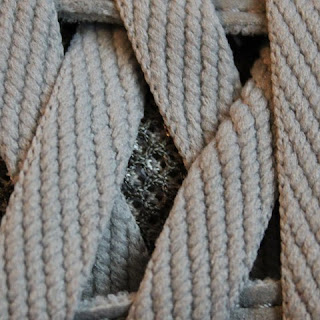
As soon as I saw this item it just brought back so many memories from my childhood.


My maternal grandmother was always a great cook. Her kitchen usually smelt of homing cooking or baking whenever we went to visit. The kitchen was filled with so many cupboards and every inch was filled with pots and pans and ingredients and preserves and everything else that kitchen's of that era used to have. In the attached dining room there was a food safe... something I had never seen before or since.
I loved helping Nana when she was baking. I loved to go through her cupboards looking for all the ingredients, or getting the eggs and butter out of the food safe. When we had all the ingredients, we then had to find the baking tin or dish before all the fun could begin.
Back then all the baking dishes were metal and well aged as many had been handed down from one generation to the next. There was no silicone and glass cooking items only appeared when I was older. Pot mitts were hand made and hung within easy reach of the oven.
I remember the little pock marks in the silver coating of some of Nana's recycled tins. Marks from use rather than artistic distressing. I love that I've been able to find my own little piece of history.

Saturday, April 27, 2013

Layout - Rare Thing


Project 3 - Rare Thing Layout
I really, really don't like getting my photo taken.
I would much rather be behind the camera than in front of it.
This of course means that there are not many pictures of me and of the few pictures that there are of me, I really don't like many (because I am just so self critical) so this is what this layout is about. This picture was taken Christmas Day 2012. I think it was taken by my husband, but it might have been taken by my niece. I wasn't 100% happy about the photo but it is the most recent photo of me that I like the most.
I needed a picture of myself for the Circle Journal swap I am in at the moment, so I've manipulated the colour on this photo and added some digital distressing to improve the picture. I printed the three versions I'd made - black and white, sepia and the third with a white vintage frame.
For this layout I started with Bazzill Kraft Cardstock. I dry brushed on some KaiserCraft Vintage White paint then misted with Mister Huey's Color Mist - White.
I cut an off-centre bracket shaped block using one of my templates from one of the sheets in the KaiserCraft Timeless Classics 12" Paper Pad. I added some Tim Holtz Distress inks in Antique Linen, Vintage Photo and Walnut Ink to give it some more depth before adhering it in place with my Teresa Collins Mega Runner from Xyron. I love the flexibility this gives me especially on curves and sharp points so it is ideal for adhering cut outs like this patterned paper.
I layered my photos (which I had hand cut to add to the distressed look) and sanded.
I adhered some of the leftover patterned paper to a chipboard dress form from Dusty Attic then cut around the chipboard dress form with my knife. I sanded the edges to hide any dodgy cutting out then inked the edges the same way as I had the patterned paper block. After heat setting the distress ink with my heat tool, I dry brushed more of the KaiserCraft Vintage White paint and misted lightly with Mister Huey's Colour Mist - White. I added two strings of mini pearls using some Helmar 450 Quick Dry Adhesive, my quick drying, hold anything permanently glue of choice.
I then painted a clock face die cut I was given in a die-cut swap with some Plaid Folk Art Acrylic Paint - Metallic Champagne for a tonal look. I finished this off with a light swabbing of Tim Holtz Distress Inks in Vintage Photo and Walnut Ink to maintain the common colour scheme across the page.
I offset the clock face and trimmed it to the paper edge then adhered the dress form in place using foam dots.
I finished this with four skeleton leaves I had received in a swap from my friend Gail in Australia. I really like the tone on tone look of this layout and was over joyed to have so many complementary neutral shades in my usual bright colour palette.
When Gail sent me her Junk Journal creation in a partner swap on Scrappers Obsessionz, she also gave me a bag of goodies to add to my journal. Included in the bag along with the white flowers I used on the Dance Layout and the skeleton leaves was a creamy die cut felt strip. I thought it was a little too heavy to use on this layout as a whole strip (it was 2.5 inches wide), so I cut it up into smaller pieces and trimmed out some excess flowers and leaves so it looked less chunky and more delicate. (If only it was that easy to get rid of chunkiness!!!)
I ended up with three pieces of various sizes. I painted these all with KaiserCraft Vintage White as the colour just wasn't quite right for the rest of the elements then I adhered them in place - top right hand corner, bottom right hand corner overlapping one of the photos and wrapped around the stand of the dress form. To these I then added clusters of KaiserCraft mini roses - Coconut, Buttercream and Honey, again with the twisted stems.
To finish off the layout I added a title which I cut using my Cuttlebug from sheets of cork. I matched this with two small journaling blocks I had received in a die-cut swap which I distressed with Tim Holtz Distress Inks in Antique Linen, Vintage Photo and Walnut Ink, again to coordinate across the layout. I hand wrote my journaling on with a black journaling pen.

Friday, April 26, 2013

Layout - Dance


Project 2 - Dance Layout
I took these photos of my granddaughter Sonia-Marie dancing in the new dancing dress I bought her in mid-January of this year. She has always loved music and dancing and as a former dancer teacher I want to encourage her love of dance (and music and crafting and reading...). I found this outfit in K-Mart and just couldn't resist. As soon as we got it home she put it on and began dancing around in our (messy) lounge. She loves the pretty flowing skirt and the way it moves when she twirls around.
I just have to add... I really love the sports function on my Canon camera, especially for moments like this!!!
I started with a base of Bazzill White Cardstock. I placed a Butterfly Stencil from KaiserCraft in the bottom right corner and misted the area with Tattered Angels Mists - Abominable Snowman, Pink Poodle and Trunk Bay. LOVE... this colour combination and how delicate it looks with this stencil!!!
I cut some Teresa Collins patterned paper Posh: Butterfly Script and Posh: Posh Butterflies to size then distressed the edges with a edge distresser. I layered these onto the cardstock so as to highlight my lovely misted butterfly.
I added the photos which I had cropped tightly and then sanded to focus solely on my granddaughter. I overlapped them slightly so they would fit on the page better as well as adding a movement and flow across the page to better fit the theme of the layout.
I love this Dusty Attic chipboard scroll border and knew I wanted to add this to the page. I painted it with Tim Holtz Paint Dauber - Picket Fence, then covered this with a mixture of Making Memories Pink Lipstick paint and Reeves Iridescent Medium. I finished this off with a coat of Iridescent Medium on its own to give it a real sparkle (though it doesn't show that well when photographed).
I adhered the chipboard scroll in place with Ranger Glossy Accents along the left hand side of the layout.
I added some handwritten journaling with a black journaling pen then adhered some white glittered flowers I received in a swap from Gail in Australia. (A girl can not have enough bling or glitter in her life... especially a little "big" girl.) I added a self adhesive clear rhinestones into the centre of each flower.
To finish off the layout I added a title using Making Memories Mini Shimmer Alphas - Blue Metro.
Close up of the painted chipboard.
Close up of glittered flowers (they are just so cute!!!)

Thursday, April 25, 2013

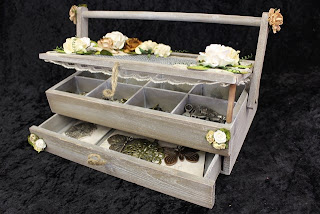
Altered Box

My first creation for the Prima Manufacturing Design Team Application.


Project 1 - Altered Box
I picked up this box at the local Warehouse. It was marked down from $25.00 to $7.00 (give or take a bit). Apart from the great price, there was just something about the potential of this box that I fell in love with.
After I pulled the box apart, I started by white washing the box inside and out to add to it's already aged look. I even added white wash to the wire netting in the lid... easier said than done.
I then added some Tim Holtz Distress Inks - Vintage Paper and Walnut Ink, just around the edges to add some warmth to the aging and make it just look for worn from use.
When I lifted the lid, it was a little ugly looking with some really out of place square dowel holding the wire netting in place. I couldn't remove it, so chose instead to disguise it with some cream lace. You can see this a little in one of the later pictures.
I painted some Dusty Attic chipboard scrolls (2 pairs) with KaiserCraft Vintage White acrylic paint. One pair I attached to the back of the box as above. The other pair I took to with my knife and cut each into a couple of pieces so I could rearrange them slightly.
I adhered a KaiserCraft ecru mini doily onto one corner (see the final picture in this series for a closer look) and added the chipboard scroll pieces in place on top of the box. Then I added a selection of roses from I Am Roses and KaiserCraft after winding their stems around a bamboo skewer and then spreading the curls. To lift the flower clusters a little, I added some leaves for a hint of colour.
As an aside, I have added all my metal charms into the tray and drawers and you can see these through the wire in the lid.
After reassembling the box completely I added a single leaf and rose to cover some less than vintage looking screws holding the handle together. I also added some small clusters of KaiserCraft mini roses to the front of the box and drawer.
When I bought the box, it had the two loops of jute on the lid and drawer though nothing to hold them together. I cut a piece of dowel about 2 inches long and sanded the ends. I then altered it with Tim Holtz Distress Inks so it better suited the colour scheme. (Above I have used the dowel to hold the lid up). I hold it closed by twisting the two loops and slipping the dowel through the loop ends like a toggle to hold them closed.
Close up of the smaller flower cluster, right front corner. You can see the coiled stems in more detail here.
Close up of the flower cluster on the left hand side together with part of the scrolls on the back. You can just see the doily underneath the flower cluster.

Wednesday, April 24, 2013

Putting it out there...

Prelude... I wrote this blog in it's entirety then when I went back and proof read it decided it was just far too long, so I have decided to split it up into more manageable chunks. If some where along the way I miss changing a reference from later in this post to the next post and here is a link... my apologies!

I've been busy the past week or so... busy on a mission to put myself out there again. I have received a few notices for upcoming Design Team calls for manufacturers and I decided to give one a go. (There may be others but I'm taking it one application at a time.)
This is not my first DT application and it won't be my last as this is definitely something I would love to do and besides I work on the theory that if I don't try then I have no chance of achieving my goal.
This application is for the Prima Design Team. Like many others I love their products, I just wish I had more of them... so this opportunity was definitely too good to pass up. All I had to do was answer some questions, send some links and pictures of three creations that demonstrated my style... and here is my first dilemma.
This is a question (and answer) that I still struggle with after seven odd years of scrapping and paper crafting. I don't really have a style, at least not one that I can discern myself... maybe someone else has a name for it and if you do then I'd be interested to hear.
I don't have a signature style, or design element, or technique that makes my layouts stand out. If I was to display a few of my layouts along with those of other people, I doubt that anyone would be able to pick them all out from the others. I'm not complaining... I like this about my "style". It means I'm not tied to anything in particular. It means I have a creative versatility and fluidity that adapts to whatever project I am working on. I can think outside the box.
Along with this lack of apparent style, I also tend not to follow trends. It may be that I'm just too slow to pick up on them, but I'd rather think it was that I focus on classic products and tools and designs rather than following (or falling for) the latest hot thing or fad. Of course it may also have something to do with a strict budgetary containment (read lack of disposable income at the moment) I am maintaining.
Anyway enough psycho-babble... let's get on to the good bits. Here are the three creations I sent through to Prima. These photos are the ones I sent through to Prima Manufacturing together with my application. I will be writing some more blog posts with some additional photos to show you more detail of each of these projects.

Sunday, April 21, 2013

Fifty {Two} Shades of Grey - Week 16

Final shoe picture...
These are my grey shoe laces on my running shoes... the shoes I bought simply because they didn't have an excess of "pink" on them... side note: why do manufacturers assume that all women like "pink"??? I have nothing against pink, it's a nice colour, but I DO NOT WEAR IT!! (Unless forced to because I have no choice, and then I wear it under sufferance and with a lot of anti-pink colours!!!)
The other thing that this picture shows is that OCD/perfectionist side if my personality... I like my shoe laces straight not twisted. Am I the only one obsessive about this???? Surely not!!!

Sunday, April 14, 2013

Fifty {Two} Shades of Grey - Week 15

Took this picture early... before I wear out the tred of my running shoes with all the running I all doing...
YEAH RIGHT!!!

Saturday, April 13, 2013

Starting her early...

When my granddaughter was born I was at the hospital for the birth and being a good scrap booker I took a lot of photos as soon as she arrived and I haven't really stopped since.
As she has started to grow up we have bonded and are very close and she knows she can come to Nana for a cuddle or when she is upset (or Mummy has growled). We've spent a lot of time down in my scrap book studio doing painting and playing with paper from a very young age. I love sharing with her my love of crafting and the feel of glue and ink on my fingers.

Today I was working on some inking some cogs I had cut out of recycled cardboard with my Tim Holtz Alterations "Gadget Gears" die for an altered project I am working on at the moment. (Nearly let slip what the project was... caught myself just in time!!!)
Sonia-Marie came and joined me and stood watching for a few minutes as I rubbed the Tim Holtz Distress Ink onto the die cut using my foam applicator. She ducked and dived about a bit, then I moved over to one side so she could see better. Next thing I know, I have an extra hand on the handle of the foam applicator, helping me to put the ink on.
Not long after that I got the order of the boot, as someone who shall remain nameless, took over and did it all by herself. Not too bad for only four years old. Okay I may need to go touch some up, but the technique wasn't too bad. I couldn't resist taking a video of her to share with you.


Or to view the video on YouTube... please follow the link below.
http://www.youtube.com/watch?v=FZdS1TlzPnk

Thursday, April 11, 2013

Easy peasy lemon squeezy... altered paper clips

I'm a member of the Scrappers Obsessionz Facebook group and each week we have a weekly MOJO Challenge. Over Easter weekend, I challenged everyone to alter paperclips.
I made a sample of what is probably the easiest altering there is to do... the only difficult part is finding these really cool paper clips so you can alter them!!!
I used various self-adhesive tapes from Heidi Swapp that I have had since forever. Fold them over the end of the paper clip, sticking it against itself then cut to size. I added a small "V" to give it some added style.
You could easily substitute this tape with washi tape as it is now so readily accessible.

Wednesday, April 10, 2013

Displaying the Wares... or more the lack thereof!!!

A few weeks (of more like months now) ago I went down to road to visit my friend Faith. She lives about an hours drive from me though if I really wanted to get technical she is literally around the corner and down the road... if I followed the road around the corner and just kept driving... but I digress.
Faith has not long moved into her newly finished office and scrap book studio, so I was stoked to be able to spend some time checking out her new digs. She's split her space into two areas using a couple of sets of cubby shelf units which she uses to display some of her creations and crafty gifts. Her display looked so amazing that when I started to plan my rearrangements I knew I had to do this as well... well something similar at least.
I already had a 12 hole cubby unit in the studio though when I looked at it honestly, I was seriously under utilising it. It had become quite literally a junk storage area where things went to live, never to see the light of day again.
So I emptied it, move it forward a couple of metres (thanks to darling hubbie's assistance), cleaned and polished it and then started to fill it up. I sorted out some of the crafts I have made and the things I have been given from some of my fellow scrappers and crafters and started to place them in the cubbies.
I've come to the conclusion I give away too many things and don't keep enough for myself... cos it looks pretty bare even after I've put in everything I wanted on display (and some I would not usually put on display). In addition I have room for boxes of all my swap items - tags, stick pins, flowers, cards etc; some items I have bought that are waiting for altering and some bottles of wine and port... many of which were 40th birthday presents.
So here is how it looks now...
Display as it now looks. 
 Top Shelf
Left - altered mask from Shar; 2012 Circle Journal "Inspiration"
Centre - Back Recycled Christmas Decorations (from Christmas Craft Challenge 2012); Altered Box from Faith; 2011 Circle Journal "Love Starts"
Right - Mini Album "Destination Earthquake Central"; Altered "P" from Faith and a selection of altered matchboxes
 Second Shelf
Left - Mini Album - 6" x 6" Recipe Swap Album; Mini Album for Class "Being Jordan"; Mini Album "Jordan's Big Adventure" (This is the story of my nephew's accident involving a cup of hot water and his recovery from being air-lifted by Westpac Rescue Helicopter to leaving hospital
Centre - Altered polystyrene balls; Christmas Decorations from SO Swap 2012; CJ "Scrap Effects"; Mini Pillow Gift Bag from Faith
Right - Selection of gifts bags; Altered Diaries and my 2013 Calendar from the SO Calendar Swap - yes it's on April as I do actually use it!!!
Third Shelf
Left - Altered Box "Christmas" from Tracey; Aussie Junk Journal from Gail; Halloween Charm in box from Fiona
Right - Altered Box; Mini Album (Sorry I can't remember who from); Toilet Roll Album - Shar
The other cubby in this row is filled with the boxes of all my swaps until I sort out how to display them - cards; tags; stick pins; charms and flowers
Bottom Shelf
Left and Right some of the items I have bought or been given which I want to alter eventually. 
The other cubby is filled with my wine and port from my birthday.

Monday, April 8, 2013

Fifty {Two} Shades of Grey - Week 14

The further through this project I get the more I realise that this is not just about the different shades of grey that I find scattered around my daily life but also about the patterns hidden within each of the patches of grey. Often the pattern impacts upon the shade of grey of the object distorting it to many more than just one shade of grey.

This is detailed stitching on the side of another pair of my running shoes. I really liked it because of the varying textures and patterns created by the construction of the shoes. First there is the fabric and the weave of this material. For this photograph I simply rested my shoe on its side on the bed. I had the overhead light on, which gave the slight yellowy reflection on the top of each "bulge" of fabric. I also had bright sunlight coming through the windows from one side.
I like the stitch detailing on the shoes but I think that is mainly because I am a sewer, even with my paper crafting. I frequently using stitching, both machine and hand to accept and highlight layouts and projects.
The final thing I really liked about this pattern are the detail stripes on the opposite angle to the stitching. They are a clear plastic, but in some lights look to be grey themselves.

Sunday, April 7, 2013

Fifty {Two} Shades of Grey - Week 13

Almost caught up...

Not only did I like this colour, I also loved the woven pattern of the fabric here. I also think it's kind of cool seeing all the different texture between the holes of the weave.
This is the other end of my running shoes... the fabric on top of the toes.

Fifty {Two} Shades of Grey - Week 12

Okay so a little bit of catch up here again...

When I bought this item, I didn't spot this particular pattern. It wasn't for a few weeks (maybe even months) that I spotted it. I fell in love instantly because it so reminds me of the pattern on Spiderman's uniform - not sure that makes me a superhero or not... okay probably not!!
So where is it... it is the back of the heel of my Slazenger running (read walking) shoes.

Wednesday, April 3, 2013

More of me... which is why there has been less of me!

Just when you thought you had seen enough of me... because I seem to be everywhere... here, Facebook, Twitter, Pinterest, my website, my company Facebook, my company blog, Linkedin... I go and find another way to put myself out there.
Where on earth is she talking about I hear you say... why of course... YouTube. Today I finally launched my own channel when I posted three videos. A couple of them are older ones from last year that I have only just been able to get to work on YouTube... one of the problems of using my digital camera to do my videoing... and the other was from only last week - a project I am still working on as we speak.
Though I haven't been posting on here all my creating, I have been busy creating things and learning new skills (lots of steep learning curves at the moment) and doing a lot of my usual experimenting!!!
At the moment there seems to be a lot of creating of one off new things, that require new skills and resources. For instance one of the things I noticed while watching other people's crafting videos on YouTube was the difference when someone added a header or start image such as their channel name before their video started. The video just looks a lot more professional right from the start. So I decided that I wanted to create something, a look you might say, to get me started from the first video I posted. Of course this is much easier said than done and hence the earlier mentioning of steep learning curves!!!
So after much fiddling and playing... here is the final result - version one, as it is likely to continue to change and develop because lets be honest, I am a perfectionist and I will never been completely happy with ANYTHING...
Now for the most important part... where to find me on YouTube so you can subscribe to my channel and follow all my crafting in real time, instead of photo by photo (though I will continue to do that here because sometimes that is just easier to follow!)
Channel - http://www.youtube.com/user/ScrapFX?feature=mhee
Or here are links to the first three videos I have posted...
Junk Journal for Gail - http://www.youtube.com/watch?v=P1784K6BmNE
Aussie Junk Journal - http://www.youtube.com/watch?v=xAemBuw84_k
Altered Torso Base - http://www.youtube.com/watch?v=Oymoz2L1bp0