Showing posts with label Tags. Show all posts

Thursday, January 23, 2014

Christmas Craft Challenge 10 of ?

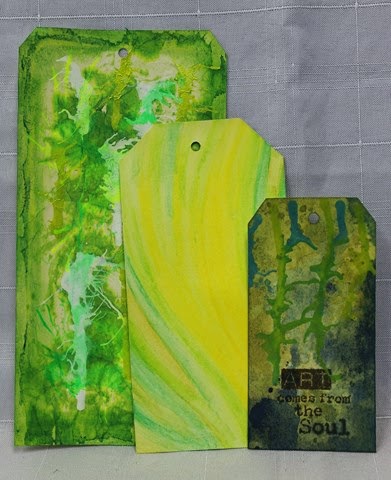
Here are the tags I included in Tai's Secret Santa Mini album... but first I wanted to show you the relative sizes of the tags.
The largest tags are just slightly smaller than the size of the album. The smallest tags are the standard size 8 tag. Here are all the tags included in Tai's mini album.
LARGEST TAGS:
 MEDIUM TAGS:
 SMALLEST TAGS:

Manila tag (home made). Tissue paper misted with Lindy's Stamp Gang Flat Fabio "Danny Zuko's Denim" mist, dried, then adhered onto tag. Edges of tissue torn. Tag edge colour with Faber Castell Gelatos blended with finger tip. Lindy's Stamp Gang Mist and liquid acrylic ink dripped down front of tag.
Manila tag (home made). Tissue paper misted with Lindy's Stamp Gang Starburst "Freaky Franken Lime" mist, dried, then adhered onto tag. Edges of tissue torn. Tag edge colour with Faber Castell Gelatos blended with finger tip. Lindy's Stamp Gang Mist and liquid acrylic ink  in white and chartreuse dripped down front of tag.
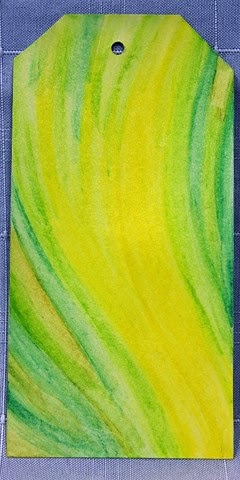
Coloured using Inktense Blocks by Derwent then blended with water before heat setting.
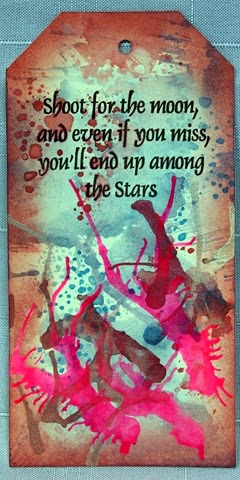
Tim Holtz Distress Inks to colour tag, dripped Liquid Acrylic Inks, Archival Ink to stamp sentiment.
Faber Castell Gelatos blended with a finger tip, Archival Ink to stamp sentiment.
Tim Holtz Distress Inks to colour tag, Archival Ink to stamp sentiment.
Tim Holtz Distress Inks to colour tag, dripped Liquid Acrylic Inks, Archival Ink to stamp sentiment.
Faber Castell Gelatos blended with a finger tip, liquid acrylic inks dripped from top of tag.
Tim Holtz Distress Inks to colour tag, Archival Ink to stamp image.
Tim Holtz Distress Inks to colour tag, dripped Liquid Acrylic Inks, Archival Ink to stamp sentiment.
Tim Holtz Distress Inks to colour tag, Archival Ink to stamp sentiment.
Tim Holtz Distress Inks to colour tag, dripped Indian Ink, Archival Ink to stamp sentiment.
Faber Castell Gelatos blended with a finger tip, Lindy's Stamp Gang Moon Shadow Mist "Golden Doubloons" splattered over tag.

Sunday, March 3, 2013

Valentine's Swap - Tags

The final swap for the month was for Valentine's Themed Tags.

Valentine's has become a non-event for my husband and I over the past two years... his choice not mine, so to be honest this year I'm a little anti-Valentines (sorry, and yes I don't know why I still signed up for all these swaps either??!!!??). So I guess my tag has somewhat of a dark tip of the hat to the day. (Skulls aren't normally associated with Valentines)
Here are all the tags, lined up. The backgrounds are all a little different, which I love about this technique.
I stamped the tag with newspaper column background stamp from the Glitz Design Clear Stamp Distressing Set Two using Ranger Ink Archival Ink - Coffee.
I then coloured over the top of the tag using Tim Holtz Distress Inks - Spun Sugar, Worn Lipstick, Spiced Marmalade, Fired Brick and Aged Mahogany with my foam ink applicators. I misted the tags with water then dried them all with my heat gun - favourite technique!!!
I stamped the tags with embossing ink and then heated embossed each tag with Detail Embossing Powder.
I hand stitches flourishes based on the Bazzill In-Stitchz "Flourishes" template which I modified to get the look I wanted. I highlighted each of the swirls with a black rhinestones.
I made the rosettes from textured black patterned paper using the Tim Holtz Alterations - Mini Paper Rosettes die affixing red buttons on the front of the rosette for some added spice.
To finish off the tags, I stapled two strips of tulle folded in half into the corner of the tag before gluing three small KaiserCraft roses on top which I had misted with Tattered Angels Glimmer Mist - Candy Corn, Pink Poodle and Lobster.
Here are some close-ups of some of the details.

Thursday, January 3, 2013

Christmas Craft Challenge - Day 20

Day 20 - December Tag Swap - Theme "Altered Doiley Tag"

Okay this is about as far from Christmas themed as I get... but given they were done in December I figure they count!!

Love the textured look of this tag by Faith, especially the netting in the background. 
 I hate the way the colours never seem to look as good in photos as they do in reality... this was shimmery and so delicately toned.
 Nice grouping of embellishments and love the paper heart. Another cool background.
 Love that Karley brought the colour onto the back of her tag (I always forget) and want my name on stickers like these!!!
Jude always creates such amazing tags. I so wish I had half of her stash!!! Love the 3D "Timeless" sentiment. 
Brenda really spoilt us... two doileys both hand crafted. One attached to the tag, the other crochet doiley can be removed so we can use for another craft. 


Loved this bag... I want some!!! 
Stunning tag by Jeanette. Both the front and bag are decorated. It's so over the top... scrapping decadence I love it!!! 

Friday, December 7, 2012

Christmas Craft Challenge - Day 5

Day 5... Junked Up Doily Tag Swap...

Okay this swap wasn't intended to necessarily be Christmas themed and when I started planning my tags, they weren't. The scope was that the tag had to include an altered doily in its design somewhere, somehow. I spent a good couple of weeks trying to find doilies... I searched high and low and inside this store and that store and couldn't find any. 
Finally I went to Spotlight and found some that KaiserCraft manufacture. They were cute and I ended up buying all three packets that they had, but I still thought they were a little big for what I wanted. They were great for on a scrapbook layout, but just too big for on a tag. Still when you can't find any... you end up buying what you can.
As I continued to wander around Spotlight... as you do looking for bargains... I stumbled upon the stand with all the crochet thread and crochet needles. 
I need to add some history here... as a young girl, my Nana tried patiently to teach me to crochet... and I quite honestly and openly confess that it was pretty much an Epic Fail!! 

I couldn't get it. 

At all!

So I decided to hate crochet... with a passion... 

As I have matured... and mellowed... my stubborn streak has gradually continued to grow to the point where I had decided that I was simply not going to let crochet get the better of me. Finally I decided that NOW was the time I was going to learn to crochet... come hell or high water!! (Of course my timing could have been better... given it was only two weeks until the doily tags were due...

Anyway I digress...

Given my acute lack of time, especially with working full time... I decided to look for alternatives... just in case... and when I least expected it... I found the coolest Christmas Tree doily die cut die... it is so cute!!!

So anyway... as soon as I saw it I knew exactly what I was going to do for my doiley tags...


Aren't they just the cutest! I really love this Christmas Tree die cut .. though it was a little fiddlier to cut than I had hoped... (it didn't cut completely on a couple of the trees so I had to do some hand cutting)... and the gluing wasn't something I considered until it was time to glue but I still think all the effort was worth it.
I also like the effect of adding the circle doily as well to look like the glow of the star on top of the tree.
They are definitely an eclectic collection of Christmas bits and bobs, but I do like the end result. I hope the girls in the swap do as well.

Thursday, October 18, 2012

Halloween Swap - Charm

The specs for the swap said we were to create a hanging charm that would be suited to hanging from a mini album or the like with a Halloween theme... sounded simple enough... but then I made my Halloween Flowers and my Halloween Pins and my Halloween Tags and then I hit a brick wall as I struggled to think of something new and not a repetition of something I had already created. 
Much thinking later... and some experimenting and one or two epic failures... and this is what I came up with.
The completed charms for the swap. I decided to make a "Compact Compound Collection" aka a portable witches brew kit - things I think the witch on the fly would be likely to use on the go.
 The brew kit comes with an instruction manual detailing what is included in the kit. It hangs from a handy Swivel Clasp from Tim Holtz, designed to hang from the keys to your witch's broom.
The front cover and inside pages of the instruction kit.
Eye of newt - hand stitched felt eye ball, with button iris.
 Back of the eye ball showing the hand stitches veins. (I loved the way these ended up looking!!)
 Moonbeams - seashell crescent drop.
Shrunken Pumpkin - fuzzy ball with stitching to create the creases of the pumpkin skin.
Drop and a half of bat blood - stacked beads 
Evil Goblin Tear Drop - stacked seed beads with a tear drop bead.
Vial of Fairy Dust - recycled mini bottle filled with mixed glitter. Chain wrapped around neck of bottle and a vial label (so you know what is inside).

Don't forget to check out post number 250 to be in to win the blog candy.

Saturday, October 13, 2012

Post 250 - Who wants candy?

Finally the milestone is reached... blog post number 250!!!

Lots to share with you...
Firstly thank you for reading and following my blog. It's really been a pleasure sharing my crafting with you. Everyone who reads my humble blog continues to inspire me to keep creating, keep experimenting and keep sharing and I am truly grateful to each and every one of you for that. It doesn't matter if you are a dedicated follower or you just happen to stumble on by some random hand of fate, I really do appreciate that you've taken time out of your busy day to spend some time here... thank you one and all.

I really can't believe I've reached this milestone. I know there are patches of irregular blog posting and then I have my patches of dedicated daily posting - especially during my annual Christmas Craft Challenge. My life seems to rarely run smoothly and my blog, like my life, needs to be flexible and able to move with the ebb and flow of reality, but I made it this far and I am so damned proud of myself for sticking with this, when so many others try and give up.

Anyway...
Firstly, or really secondly after patting myself on the back, I want to share the results of the classes I taught up at the Caz Dezign Scrap Retreat. I created a sample page... the original blog posting is here... but knew that I wanted to create something a little different on the day. Even though the classes were themed "Halloween", as it's a holiday we don't really celebrate here in New Zealand, I wanted to show that the same page layout could be used for any theme because really the classes were all about the techniques and sharing my love of some totally cool tools, which I need to create a "My Favourite Tools" post about.

Both the tag and layout were all about using Tim Holtz Distress Inks, which I totally love and how versatile these inks really are. One of the reasons I love them so much is that you can create totally unique, personalised backgrounds for your photos without too much effort. I also love the intensity of the colours that can be achieved as this is something truly dear to my heart. I've said it before and I will say it again... I'm NOT a pastel person. Sorry if you are... I'm just not. I love my colours to be big and bold and bright and intense and stand out and just say I'M HERE!!! (A bit like me at times!!).

Anyway...
I am also a HUGE True Blood Fan. I've seen every episode of every season of the HBO show. I've read each of the True Blood books that Charlaine Harris has written at least four times (and there are a dozen or so books). The wallpaper on my laptop is True Blood, I own the first three season on DVD (soon to buy season four)... so yes I am a fan!!

I decided a while ago that I wanted to scrap some pages, purely for my own indulgence of my favourite show and it's characters. So every now and then I look for photos from the show and download them for later use. On one of these googling sessions, I found an incredible wallpaper/photograph on the HBO official website of the the main character Sookie Stackhouse (played by the adorable Anna Paquin) surrounded by three hotties... the three men in her life in the show - Eric Northman (Alexander Skarsgard), Bill Compton (Stephen Moyer) and Alcide Herveaux (Joe Manganiello). I just knew this photo would be in my fantasy album!! This was the photo I took along to scrap for the class as I knew the techniques I was going to demonstrate would be perfect for the photo in question.

So here is the end result...
 Completed layout
 Embellishment grouping - flowers and rosettes created using Sizzix Tim Holtz dies.
The tag created in the first class and added to the layout in the second class.

I really think this layout turned out better than I had hoped for. The colours are amazing and despite the intensity, still allow the photo to stand out itself.

Here are the original and the one created in class...

And now for the good bit...

To celebrate this milestone blog - post number 250 - I am going to give away some blog candy. 
I will be adding some more goodies to the stash, but for now, hopefully that grabs your interest.
In order to go into the draw you need to do the following:
  1. Follow my blog - just simply click on follow on the right hand side of the blog if you are not already a follower.
  2. Like me on Facebook - Scrap FX
  3. Leave a comment on this post to let me know you have entered the draw.
I will draw a name at random on Saturday 20th October 2012 and post the winner's name. Good luck and thank you for joining me for this celebration.

I love you all xxooxx