Monday, April 23, 2012

Give aways

With a couple of posts about my creations over the last week or so I've promised a give away to a lucky commenter. The close off date was yesterday, so it's time to announce who are the lucky recipients of some of my creations.

Journal Spots - go to Lainie
Dress Form Tag - goes to Bern

In addition I will be sending a template of the dress form to my good friend Miss Wendy as she asked so nicely and I am more than happy to oblige.
I hope everyone enjoys their little gifts from me to you with love. I will get these in the post this week.

Sunday, April 22, 2012

My New Toy

After much umming and ahhing, some window shopping, lots of price comparing and some incredibly helpful advice from my good friend Gypsy, I've splurged and finally upgraded my camera.
My trusty Panasonic Lumix will soon be in the hands of my step son Kurt, while I now learn to find my way around my new Canon EOS 600D with twin lens pack.


Yes I will be sharing pictures as I start to learn how to use everything. All feedback will be greatly appreciated. Also if you know of any great tutorials, blogs or videos on making the most of your digital camera, but sure to leave me a link in the comments.

Sunday, April 15, 2012

Journal Spot Swap

I know I seem to be doing a lot of swaps at the moment but to be honest, I'm quite enjoying them. I love that they are small, quick and I can create them in a production line. And when you are not really feeling very crafty they are great for reminding yourself how crafty you really are.


For this swap we had to create three journal spots, each with a Shabby Chic/Vintage style. I love these styles, though they are not really my usual scrapping style, so I sometimes struggle with them. I think much of my problem is my dislike of anything too pastel. That and I'm too much of a perfectionist and I dislike most things I create. Who doesn't think something could be better?


The guidelines said a) 3" b) 3 1/2" c) 4" and I loosely followed this.
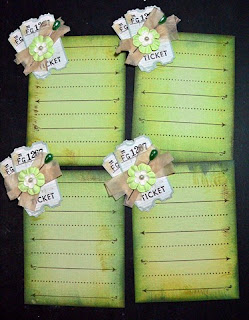
Here are the finished journaling blocks with one of each for each participant.
And here is how I created each block:
Green Ticket Journal Spot:
Cardstock base in Celery cut into 4" x 3" rectangles
Distress the edges using Tim Holtz Distress Inks (in order) Crushed Olive, Faded Jeans and Walnut Stain. As I add each layer of distress ink I move less into the middle of the cardstock so you can see some of the previous layer of distress ink.
Stamp Hero Arts KEC28 Write Your Message stamp centred across the journal block using Walnut Stain Distress Ink.
Layer 2 tickets from Pink Paislee Parisian Anthology - Tickets, slightly off centre of each other. Pin together 2 strips of tissue paper from fabric pattern (1" x 2") and layer across tickets. Add Paper Flowers layered with a medium pearl. Adhere embellishments over top left corner.
Brown Postcard Journal Spot:
Grey cardstock cut into 4" x 2 3/4" rectangles

Distress the edges using AMM Caramel Paper Stain followed by Tim Holtz Distress Inks Stormy Sky and Walnut Stain. I applied the Distress Inks in a similar manner to the green journal spots.
Stamp Inkadinkado 94012 Postcard stamp centred across the journal block using Walnut Stain Distress Ink.
Distress the edges all around the journal block using an edge distresser.
Spritz the cardstock liberally with water using a mister/spritzer bottle. This will tone down the ink considerably and make the cardstock more pliable. Using your finger tip, roll the edges and corners to give a weathered look. Leave to dry or dry with heat tool.
When completely dry mist lightly with Tsunkineko Walnut Ink Antiquing Solution (Liquid), Tattered Angels Glimmer Mist Suede and Coffee Shop. Dry thoroughly with heat tool.
Salmon Key Journal Spot:
Trim Salmon cardstock to 3" x 3" square then use corner rounder on each corner.
Lightly sand the cardstock to reveal the white inner core and distress the cardstock.
Stamp larger flower corner stamp from the KaiserCraft Chapter One stamp set using Versa Mark watermark stamp pad.
When the ink is dry wipe the journal block with a Clear Images Pad then stamp Key stamp (Limited Edition Rubberstamp 650-594-4242) with embossing ink. Cover generously with Stamp It Embossing Powder in Polysparkle. Heat with heat tool to process embossing powder.
I really love the way that all three journal spots turned out. I also love that I was able to use colours I love and use all the time and yet still create a look that I think fits a Shabby Chic / Vintage theme.


Once again I created an extra set of the journal spots, so I will give this away to another lucky person who leaves a comment on my blog. Cut off date for comments Sunday 22 April so be sure to leave a comment to go into the draw for a set of adorable journal spots.

Friday, April 13, 2012

Dress Form Tags and a Give Away

Dress forms, in all forms, are very much in vogue at the moment in scrapping. They hark back to the by-gone days of home sewing when mum would make clothes at home because they were to expensive to buy them from the shops.
They remind me of my mother teaching me to sew without a pattern, or by meshing two completely different patterns together, without tailor's tacks and basting and all very much to my sewing teacher's disgust.
I've never had a dress form though a few years ago I did buy a wire display form I bought so I could display all my ribbons (before anyone else thought it was a great idea) but which I have yet to add a single ribbon to. My friend Glenna bought me a matching mini dress form for my 40th... which is also just so cute... but once again I digress.
Last month I signed up for a dress form tag swap and then promptly forgot all about it completely... I'm sure my head isn't screwed on properly at the moment.
I saw some of the pictures others in the swap have posted, and thought to myself, "ohhh they are gorgeous, wish I was doing that swap." Then two days before the posting date I checked and low and behold there's my name on the list of participants. Oh bugger!!! Okay, let's not panic.
I calmly went down to the studio, looked at my dress form templates and chipboard die cuts and said to myself... "okay self, now what?"
All the other pictures showed dress forms attached to standard luggage tags but I decided to be different (no surprises there)... instead of attaching my dress form to a tag, I decided my tag would be the shape of a dress form. My logic was... I didn't have enough dress form chipboard die cuts of the same style for the size of luggage tag I had and the size I did have enough of, just looked too small against the tag. The template I had was also the size of the luggage tag so it really didn't make sense to then attach it to a tag which would virtually disappear completely. Hence... the approach I took.

So what did I do... (Sorry as it was a bit of a rush I forgot to take photos as I was speed scrapping to get them done before my trip down to Christchurch).
  1. Traced around my template onto some recycled ice-block boxes
  2. Cut out the dress forms by hand... if I had a die cut of a dress form I would have used that as it would've been much quicker but I don't so I went retro style!
  3. Coloured the plain side of the dress forms using AMM - Caramel and Chocolate Paper Stain; and Tim Holtz Distress Inks - Mustard Seed, Vintage Photo and Fired Brick.
  4. Stamped the all the dress forms with a collage of three small stamps - Making Memories - Great Escape - Icons, and two freebies from a magazine. I put all three stamps on the one block which made life so much easier. I used the Tim Holtz Walnut Stain Distress Ink for the stamping.
  5. Spritzed the dress forms with Tattered Angels Glimmer Mist - Gold, Suede and Coffee Shop.
  6. Adhered scrap cardstock onto the back of the dress forms, let the glue dry then trimmed the backing to shape. Next time I would do this step after the next step instead of before so as to hide the sewing.
  7. Punched holes along the hem of each dress form then hand beaded fringing using embroidery thread with seed beads and bugle beads.
  8. Adhered feathers (pulled off large black feathers keeping intact as much as possible) using glue dots. Each dress form has two feather clumps - one pointed up, the other down.
  9. Misted some KaiserCraft Mini Paper Blooms (Buttercream) with Gold Tattered Angels Glimmer Mist, then attached using Elmer's Glue across the join in the feathers.
  10. Adhered KaiserCraft self adhesive gold rhinestones to form necklace.
I love that each of them is different.
I love the way the glimmer mist muted the stamps images to make them look very vintage.
I love the colour scheme - but then I am an Autumn colour girl. (I have to say the photos just don't do them justice. In real life they are so much richer and warmer with more depth.)
I love the simplicity yet stylishness of the finished look.
I love the timeless look that can go with any theme of a layout.

I created these so that they can be added to a layout either as they are or with extra ribbon, flowers, bling extra added to blended them into the theme of the page.

Give Away - 
I also created an extra one, so I will be giving this away to one lucky person who leaves a comment on this post.  Let me know where or how would you like to use the tag if you were to win it and I will draw one lucky person to receive it. You have until Sunday 22 April 2012 to leave me a comment.

Tuesday, April 10, 2012

Long Weekend... Epic Fail

Easter Weekend is over for another year.
I did have plans to get a whole lot of crafting done.
I started off well.
Thursday afternoon, dropped off photos to get printed at Dick Smiths at their extra cheap photo price - 5c for a 4" x 6".
Thursday night, finished off some tags for a swap.
Friday taught a beginner scrapbooking class. (It was family so didn't count as working really).
And then it all fell apart...


I don't know what it is about me and long weekends, but I have a really bad habit of coming down with the flu at the worst times... usually right in time for a long weekend. 


And this year was no exception... grrrrr!!


I was too crook to go pick up the 370+ photos I got printed... though my darling hubbie was sweet enough to do it for me.
I did manage to look at them and sort them... eventually. I think that was Sunday...  though it could have been Monday... the days are blurry.
I did manage to crop some of the photos... just the white bits off the edge where the photo was for instance square, but that was it for crafting.


I hope everyone else managed to make the most of long weekend and got to enjoy doing something wonderful with the people most important to you.


Monday, April 2, 2012

I'm Back...

I'm just back from four days down in Christchurch staying with my parents who still live there despite having lived through over 10,000 earthquakes since September 2010. I did feel one when I was down there... a little 3.77 so it barely counted. (There were 4 others while I was there but I didn't feel them).
The bonus for my weekend was my sister, Keryn, driving down from Nelson with her three sons, (Jordan - 6, Dallas - 4 & Troy - 1) so they could also spend some time with Auntie Paula.
I did get a little crafting done while I was down there and will post some pictures in a day or two. I also managed to visit one scrapbook shop, a lady I have brought many a bargain off via TradeMe - Maz of Craft E-Stuff. I had a stamp to collect I won in an auction as well as spending some time trolling through her stock.
My Dad was kind enough to take me out on a couple of "Tours of Christchurch" to see the damage. To put this into perspective he said... "We'll take my 4 x 4, cos Mum's car can't travel on some of the roads." And a couple of times we did need to engage the extra grunt and we were definitely grateful for the higher wheelbase of the Suzuki.
I took heaps of photos... hello, I'm a scrapbooker... and am really looking forward to adding these to my mini journal I created but I wanted to share some of the photos that really touched me first.


River Road, Richmond - This used to be an asphalt road that followed the meandering Avon River... now it looks more like a shingle pit. This is red zone land. The houses are boarded up and the gardens are over grown. It's almost deserted except for the tankers pumping out the sewerage where the pipes have broken. While some roads look and feel normal, others like this are like riding an uncomfortable roller coaster on wooden seats over hidden rises and dips in the track.
River Road, Richmond - This used to be a perfectly good curbing and gutter beside a perfectly good asphalt road... now it looks more like a grey twig snapped by a careless tramper. The road around the Avon River has dropped so much that stop banks of shingle have had to be built up to prevent the river from adding to the existing damage. 
This used to be a foot bridge... now it looks like a new age, art nouveau twisted steel sculpture. 
Throughout the suburb of Sumner this is all you can see at the bottom of any cliffs... a long line of double height containers designed to catch any rubble that falls from the cliffs... including the houses teetering precariously on the edge of what is left of their back yard. In some areas the containers are backed up by concrete K-rails for added strength.
What is left is of one of the pubs in Lyttleton. Most of the pubs in this suburb look to be closed for good. As this is a port town, there were a fair few pubs. This picture also shows that despite what has happened, life still goes on. Washing still hangs, drying amongst the ruins.
A number of older buildings around the city seem to be held up (or together) by sheer brute force. Steel rails and concrete blocks hold this building and the one below together, as much as possible.
Trying to save what you can... but is it too little too late? 
Madras Street, between Gloucester and Armagh Streets. I remember both sides of this street filled with multi-storey buildings... now they are empty plots. 
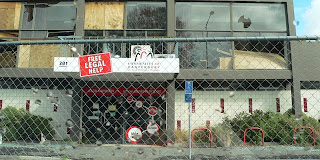
Broken windows or boarded up windows. You can still see so much shattered glass just lying on the ground in front of the building. 
This used to be the yard of one of Christchurch's most prestigious car dealers. Now it looks like a demolition yard.
Not sure if this is High Street or Tuam Street from St Asaph Street... I just don't recognise it any more. (High Street I think though). The buildings have all lost their farcades. At the intersection of High St and St Asaph St is a sign "Please save High Street".
Damaged beyond repair. So many streets especially in the CBD are still closed, though Dad did say they are opening up more and more as the days and weeks pass. 
The Oxford Clinic being demolished. 
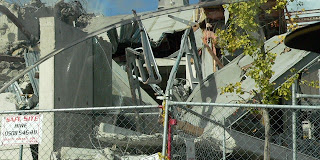
Twisted pile of steel and rubble. I don't know what it was other than a multi-storey building near the CBD. 
St Knox Church down Bealey Avenue. As I drove from the airport to my parent's house, this was the first sign of any real damage I saw. Prior to this I had seen temporary fences, lots of road works, the odd fence and light post on a lean but it all looked pretty tame to me, then I saw this. As I drove back past later in the day we slowed for the traffic lights. I glimpsed and saw the shimmer of what looked like a gold or silver medalian hanging from one of the columns inside the Church. It was only small, maybe just an inch or so, oval or round. I don't know how it got there or who put it there, but I'd like to think that it was the medal of some Patron Saint and that it protected someone in times of need.
This is the memorial of 185 White Chairs. One chair for each person who lost their life as a result of the earthquake on 22 February 2011. There are several notices explaining to visitors what the chairs represent. You are invited to leave a message in the remembrance book or sit in any of the chairs for a moment or two of contemplation.
There are so many sights, so many pictures I have taken or could have taken. There is so much to look at and to feel that it gets a bit overwhelming. It was hard to see my home town looking like this, though it wasn't as bad as I was expecting. My timing had a lot to do with that... the worst of the clean up is over, there was no liquifacation nor the panic of being in the middle of a crisis. The scar are there on the land and the people, just some are more visible than others.
I love you Christchurch.