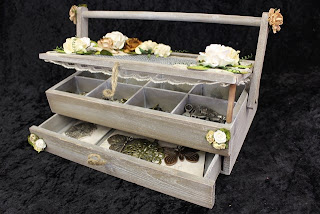
My first creation for the Prima Manufacturing Design Team Application.
Project 1 - Altered Box
I picked up this box at the local Warehouse. It was marked down from $25.00 to $7.00 (give or take a bit). Apart from the great price, there was just something about the potential of this box that I fell in love with.
After I pulled the box apart, I started by white washing the box inside and out to add to it's already aged look. I even added white wash to the wire netting in the lid... easier said than done.
I then added some Tim Holtz Distress Inks - Vintage Paper and Walnut Ink, just around the edges to add some warmth to the aging and make it just look for worn from use.
When I lifted the lid, it was a little ugly looking with some really out of place square dowel holding the wire netting in place. I couldn't remove it, so chose instead to disguise it with some cream lace. You can see this a little in one of the later pictures.
I painted some Dusty Attic chipboard scrolls (2 pairs) with KaiserCraft Vintage White acrylic paint. One pair I attached to the back of the box as above. The other pair I took to with my knife and cut each into a couple of pieces so I could rearrange them slightly.
I adhered a KaiserCraft ecru mini doily onto one corner (see the final picture in this series for a closer look) and added the chipboard scroll pieces in place on top of the box. Then I added a selection of roses from I Am Roses and KaiserCraft after winding their stems around a bamboo skewer and then spreading the curls. To lift the flower clusters a little, I added some leaves for a hint of colour.
As an aside, I have added all my metal charms into the tray and drawers and you can see these through the wire in the lid.
After reassembling the box completely I added a single leaf and rose to cover some less than vintage looking screws holding the handle together. I also added some small clusters of KaiserCraft mini roses to the front of the box and drawer.
When I bought the box, it had the two loops of jute on the lid and drawer though nothing to hold them together. I cut a piece of dowel about 2 inches long and sanded the ends. I then altered it with Tim Holtz Distress Inks so it better suited the colour scheme. (Above I have used the dowel to hold the lid up). I hold it closed by twisting the two loops and slipping the dowel through the loop ends like a toggle to hold them closed.
Close up of the smaller flower cluster, right front corner. You can see the coiled stems in more detail here.
Close up of the flower cluster on the left hand side together with part of the scrolls on the back. You can just see the doily underneath the flower cluster.


2 comments:
It's gorgeous Paula. That box was a great find at $7. Wishing you lot's of luck.
Thanks Lainie. Yes I was pleasantly surprised at the cost. Love the way this turned out... but I might be biased LOL
Post a Comment