
I've tried to be a good girl, honest...
I've tried really hard to hold off on blogging this Christmas Craft item, honest...
But you see I finished work today, so I feel the need for some kind of a celebration...
So I can't wait any longer, I just HAVE TO share this Christmas Craft!!
My Christmas Angel
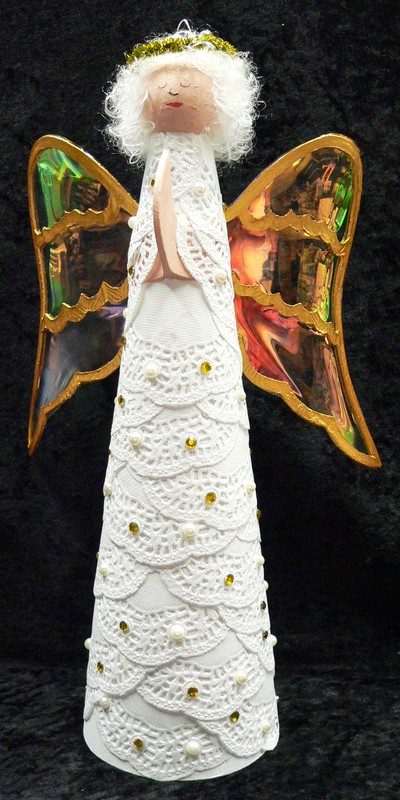
When I bought my 3D Christmas Tree I also bought an Angel on sale. I've wanted a nice handmade angel for our Christmas Tree for a while now, but I've never been able to find one that I really loved so I figured if I didn't love one of my own creations, then I would have no one to blame but myself!!!
I found this strange beige little angel in desperate need of some tender loving care and a splash of colour. (Where is Gok when you need him??)

First thing I did was clip her wings. Well actually I did more than clip them, I removed them completely... though it was only temporary, she does get them back at the end of the make-over!!


While the paint was drying on the wings, and so it didn't feel like I was sitting watching paint dry and doing nothing... I also painted the body of my fair maiden. I painted her head to toe in a couple of layers of white gesso... with a KaiserCraft foam brush of course. These truly are a Godsend to every crafter and you can pick them up very reasonably. I have three different sets in my eCommerce shop.

I had seen the technique I ending up using to decorate her on a Christmas Tree and thought it looked beautiful, so I decided to "do it my way" and tried the same thing on my Angel.
I trimmed small paper doileys (from the $2 shop) in half. I adhered them in place around the body using a glue dot on either side of the doiley. I didn't worry about putting the glue dot on the die-cut part as I knew I would be layering the doiley halves on top of each other for complete coverage. It only got a little tricky around the arms... mainly it was just a matter of placement around the arms though as the body became significantly smaller near the head, I did have to trim the doiley halves a little and add some additional cuts to aid the shaping at this point. It was pretty much a feel it as you go type of thing.

I think I prefer this, because as soon as it was done, I couldn't help thinking how much she looked like my late Nana - Lillian Mary Wilson (nee Walker). So from the time she received her hair, she also received her name. She is the Angel Lillian.


I cut some Angelina's Heat Bondable Film to the size of the wings.
Glued the film in place using Helmar Tiger Grip Glue and left this to dry overnight. This may have seemed like a long time, but I wanted to be sure.
I trimmed the film down to a 1 - 2mm overhang around the outside edge of the wings.
Using my trusty head tool, I heated the Angelina's film until it was taut across the frame of the wings.
I was not expecting the film to pull and re-shape the wings as much as what it did though I love the end result even more than I expected. The extra shaping just adds another design dimension that I love so much.

The final step was to add a little bling by dotting individual pearls and gold rhinestones on each of the roses in the die-cut part of the doileys forming the Angel's dress.

{Edited - Added Before & After Photo}

1 comment:
Wow Paula, what a huge difference! Well done.
Post a Comment